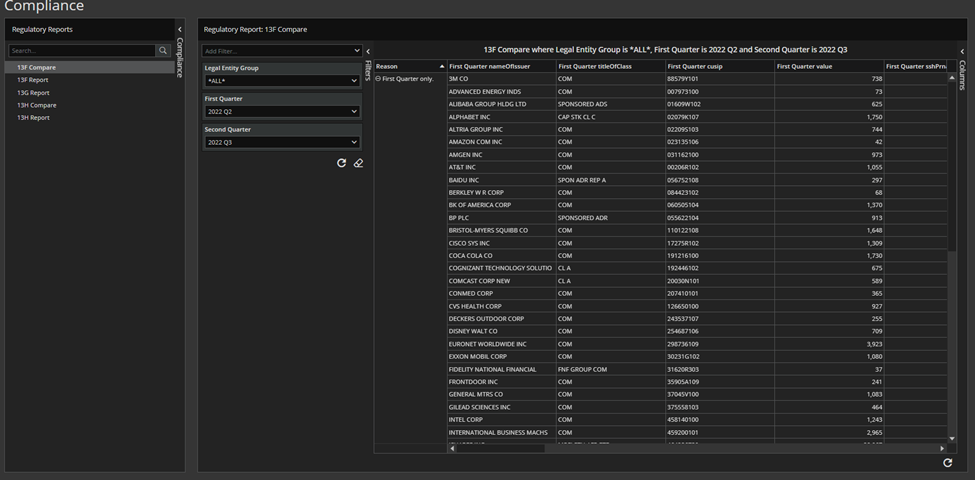
The Compliance Module gives you an interactive workflow with Securities from specific list of securities called 13F SEC List and also with brokers and broker accounts that have the ability to hold or trade US securities. There are three regulatory reports for now- 13F Report, 13H Report and 13G Report. Also, there are two compare reports – 13F Compare and 13H Compare. Also, there are two compare reports – 13F Compare and 13H Compare.
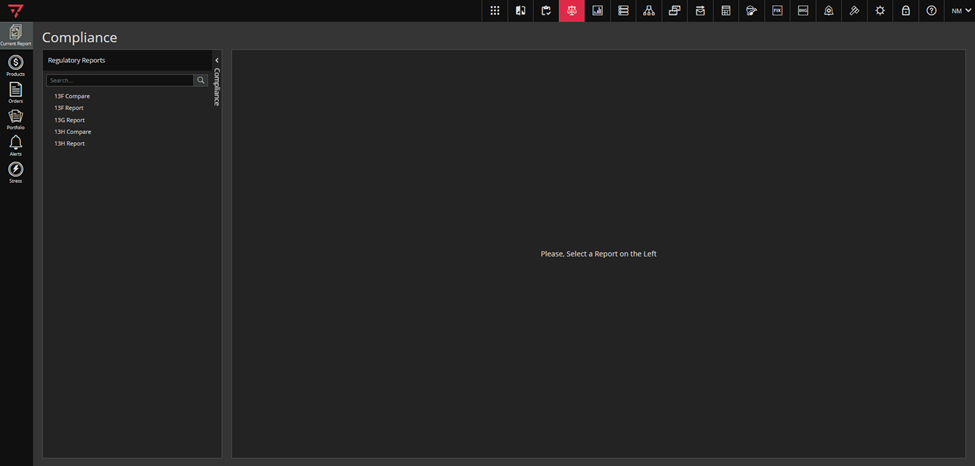
To access the Compliance module, click on this icon in the singleton modules toolbar as in the screenshot below.

When the user enters the Compliance module, he has to select the report in the Compliance curtain on the left.
Let us first consider the 13F Report.
At the end of each quarter, hedge funds that manage more than 150M have to file a report called 13F with the US SEC (US SECURITIES AND EXCHANGE COMMISSION).The US SEC comes up with a PDF that lists all the securities that need to be reported.
We show the fund’s positions (as in number of shares) in the securities from the US SEC list as of the end of the quarter. For example, if the fund owns 10,000 shares of IBM as of September 30, 2020 and IBM is in the US SEC list, our report needs to show IBM 10,000 shares for the end of third quarter 2020 (2020 Q3).
The 13F Security List tuple in the Tuple Space module is populated with securities from the 13F list.
The Compliance module offers to the user an interactive workflow with 13F securities.
The selected 13F Report will appear on the right.
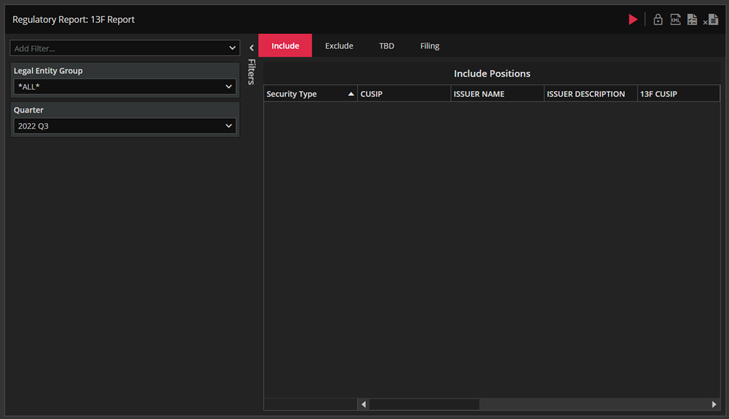
In the Regulatory Report: 13F Report section the user can have an interactive workflow with securities for selected legal entity group and quarter.
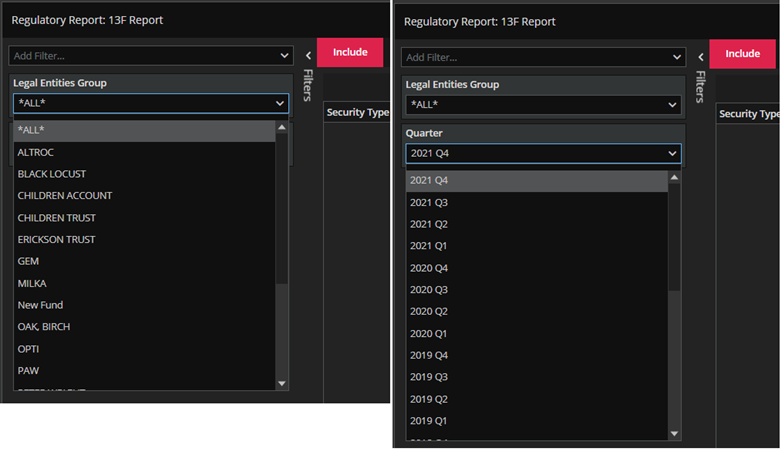
There is a pre-filters curtain with Legal Entity Group and Quarter filters.
In the Legal Entity Group drop-down menu there are all available legal entity groups. Obviously, *ALL* contains all legal entities.
From the Quarter drop-down menu the user can choose desired quarter. The quarters in the Quarter list are sorted in reverse chronological order with the most recent quarter at the top.
The *ALL* Legal Entity Group and most recent quarter are set by default.
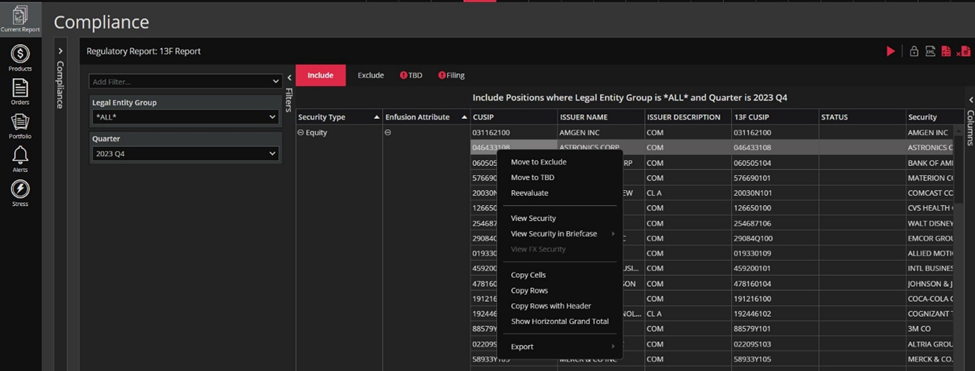
If the specific selection of Legal Entity Group and Quarter has never been run before, clicking on the RUN button in the upper right corner of the Regulatory Report: 13F Report section runs the 13F Report process, populates the 13F Report tuple and populates the data in the Include, Exclude, TBD tab and Filing tab (see screenshots below).
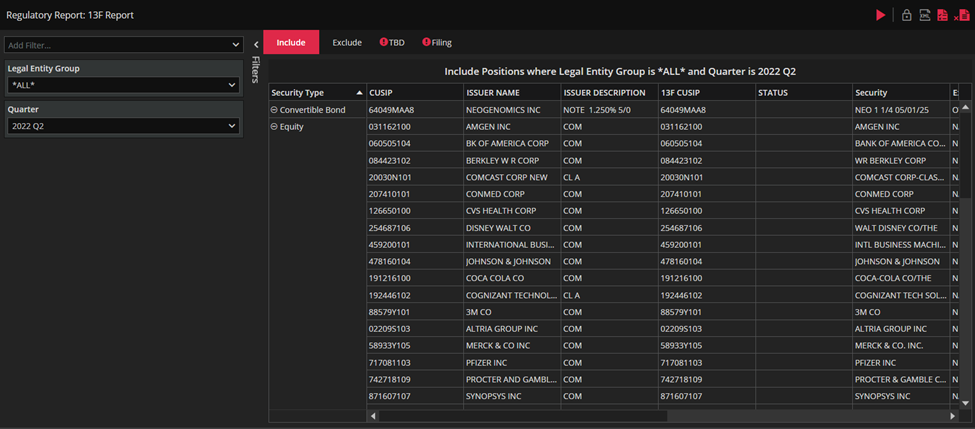
Securities are distributed in tabs according to certain criteria.
When the tabs are populated with data then two more buttons will be enabled in the upper right corner of the Regulatory Report: 13F Report section (you can see in the screenshot above).
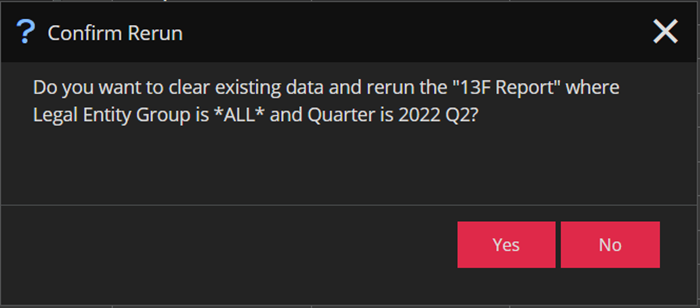
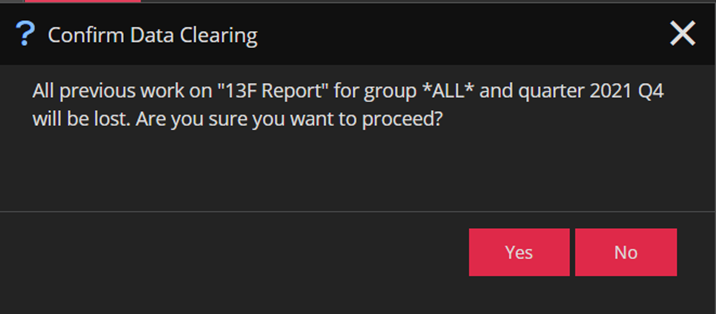
If you click on the RUN button again the 13F Report process will rerun after you choose “Yes” in the confirmation message (see screenshot below).
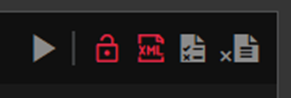
The second button on the right is the “LOCK” button. This button will allow you to lock the regulatory report that persists data from the previous run for the specific input. So, basically, when input is locked for a regulatory report, all actions for editing the data, such as move records. Reevaluate, clear and rerun will be disabled for all users.
When some report is locked, “[LOCKED]” suffix will be added to the title.
Also, there will be pop-up with a confirmation that this is what user really wants.
LOCK button will be disabled when a regulatory report hasn’t been run for the specific input (Legal Entity Group and Quarter) or in the case when TBD tab hasn’t been cleared. In the case when the regulatory report is locked for the specific input, instead of the lock button, there will be UNLOCK button.
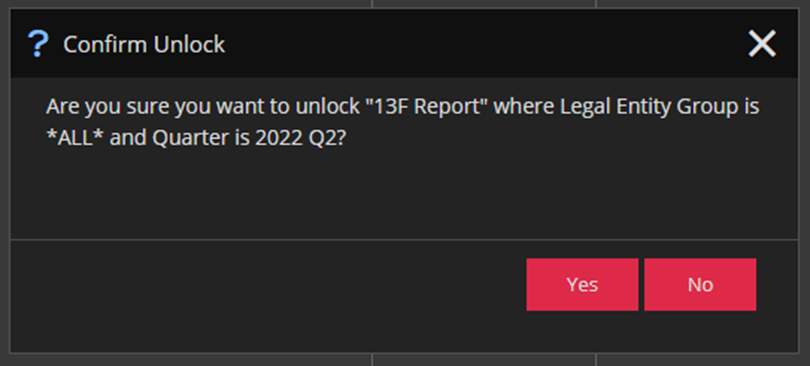
There will be a pop-up confirmation when user tries to UNLOCK the regulatory report.
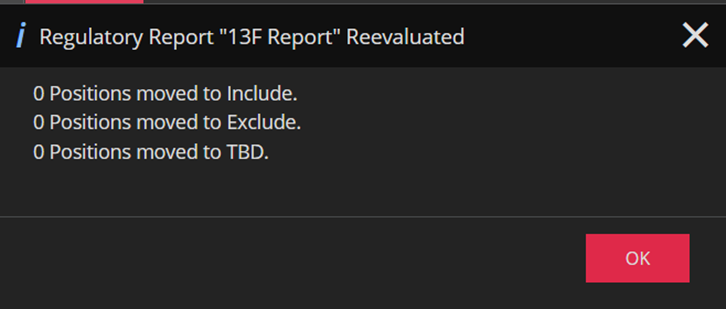
The third button on the right is the “REEVALUATE” button. The point of “REEVALUATE” button is to re-evaluate every position – in other words, to recheck the criteria for every row in Include, Exclude and TBD tab. So, any other work wouldn’t be lost. Position information should not be re-evaluated. That is, the key fields and quantity. Only security data and prices fresh should be pulled and used to re-evaluate existing positions.

In this case there will be pop-up message saying for example “0 positions moved to Include. 0 positions moved to Exclude. 0 positions moved to TBD.”
REEVALUATE button is disabled when there is no data in the grids.
The first button on the right is the “CLEAR DATA” button that is just going to clear the data in all four tabs and kill the data in the back for selected Group and Quarter, so that the next RUN starts from scratch. CLEAR DATA button is disabled when there is no data in the grids.

Of course, there will be a pop-up with a confirmation that this is what user really wants, just to reassure that the work done prior to clicking any of the buttons will not be lost by accident.
You will notice that there is one more button in the upper right corner – “GENERATE SUBMISSION FILE” button and it’s the marked with green rectangle in the screenshot below.
By clicking on the “GENERATE SUBMISSION FILE” button, user will be able to generate XML file. This button will be enabled only when there is no data in the TBD tab. We will say more about this option later.
When we run the 13F Report process, then 13F Report tuple is populated and the tuple accurately represents what we are doing in the process. If the specific selection for Group and Quarter has been run before then click on RUN button would just pull the data from the 13F Report tuple and populate the data in tabs.
You can see all the data in the Data tab of the tuple.
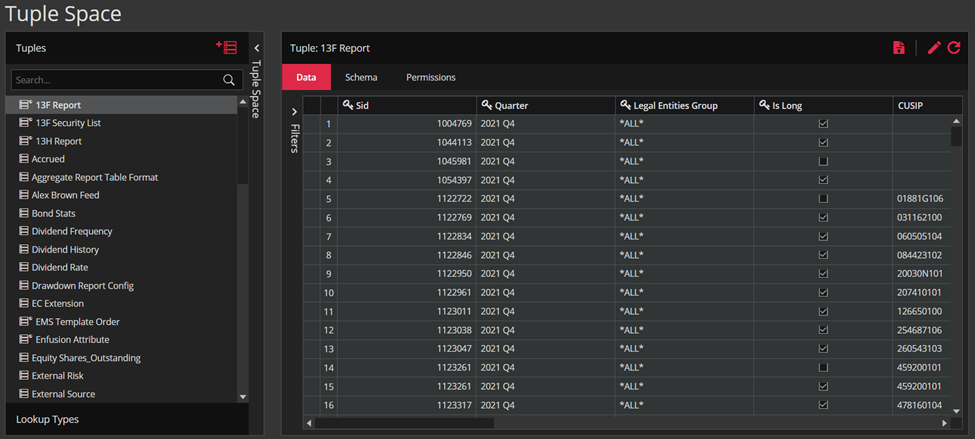
In the Schema tab you can see Name, Tuple Type, Key and Value Fields. In Permission tab you can adjust permissions.
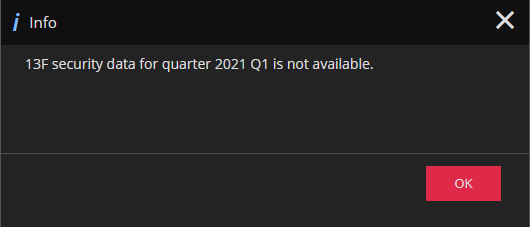
If the user runs the 13F Report process for some quarter for which we do not have 13F security data in the 13F Security List tuple, then an info message will pop-up like in the screenshot below.
The following will be about interactive workflow with data and generating XML Submission File.
Let’s say that the user runs the process for the selected Group and Quarter and that all four tabs are populated.
The grid-view in the Include tab has group by on Security Type and Enfusion Attribute columns.
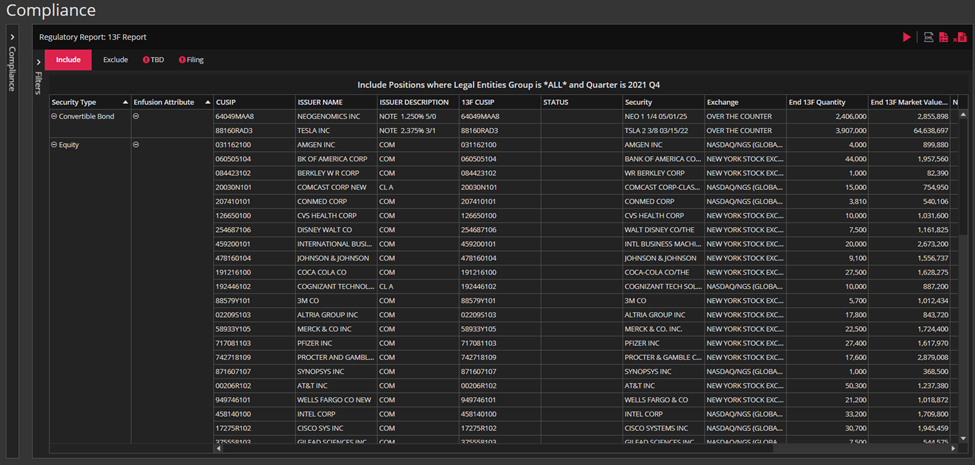
The Enfusion Attribute column will be populated if we have that security in the Enfusion Attribute tuple (see screenshots below).
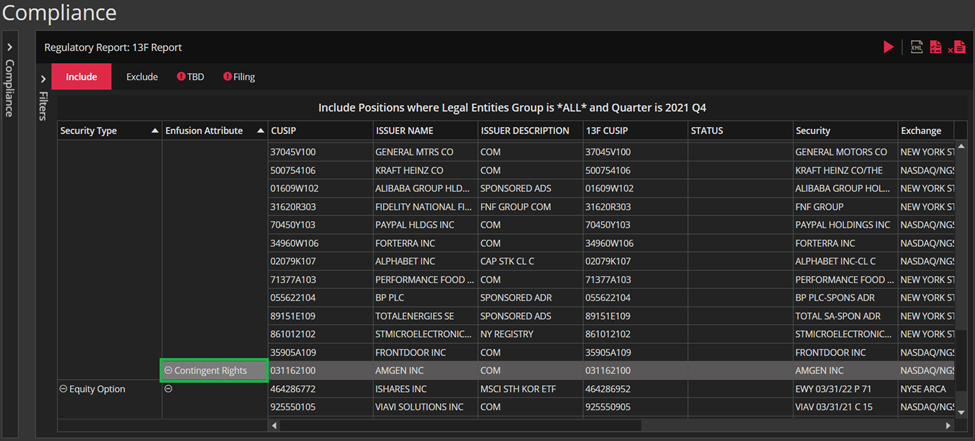
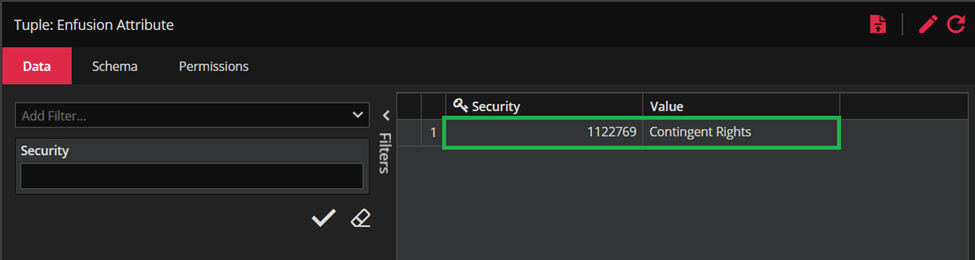
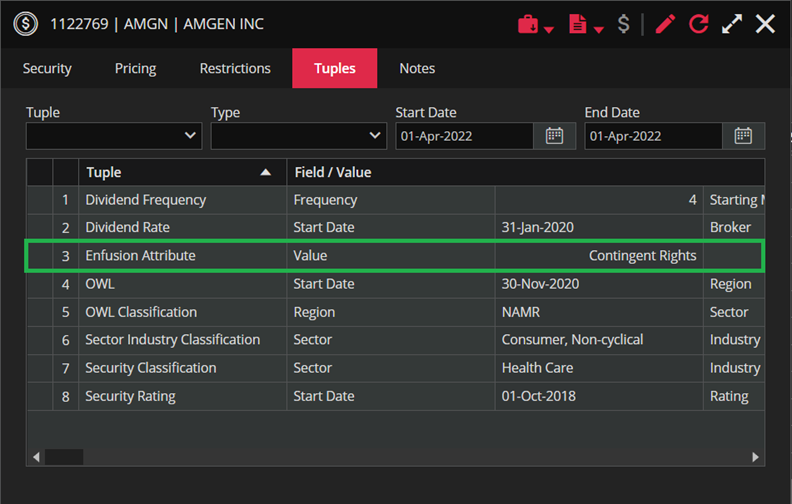
Also you can check the Enfusion Attribute value in the security Tuples tab.
The columns: Sid, ISIN, SEDOL, Is Long, Bloomberg Code-Short, Option Put/Call and Price Currency are excluded in the default view. But you can add them by using Grid Editor from the context menu in the Include tab.
Also, in the default view we have Notes, Moved By and Move At columns that contain information about movements from tab to tab.
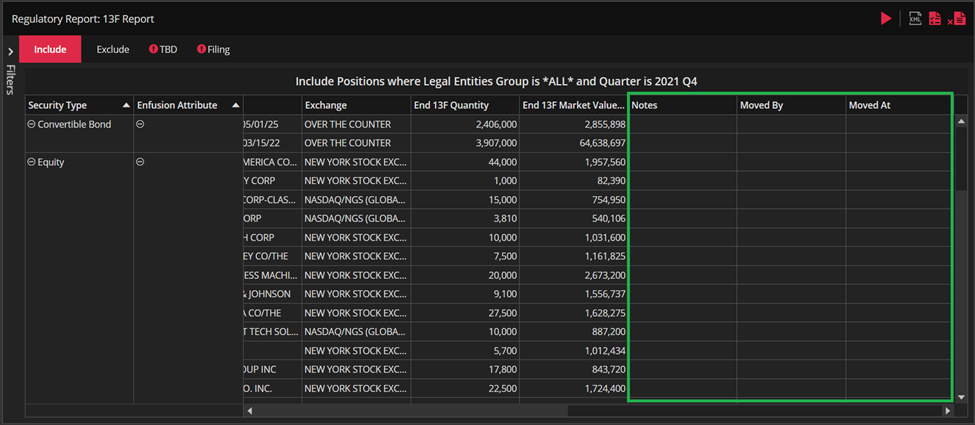
By using options Copy Cells, Copy Rows and Copy Rows with Header from the context menu, you can copy selected content. There exists Show Grand Total option and option Export to XLSX for exporting the grid in XLSX format.
You will also notice context menu security actions-View Security and View Security in Briefcase.
It should be mentioned that the double click from the grid opens up the Security form applied to Include, Exclude and TBD tab. When security form is opened, you can do the changes or book trade.
There are actions in the first section of the context menu: Move to Exclude, Move to TBD and Reevaluate.
You can move the data by removing row from one tab and add it to another by right clicking on a row or group of rows and selecting Move to Exclude or Move to TBD.
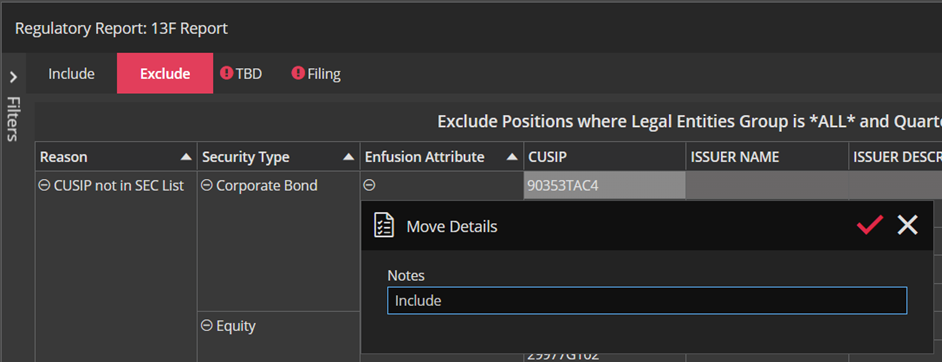
When we click on Move to Exclude or Move to TBD the Move Details form will pop-up and we will have to type in a note.
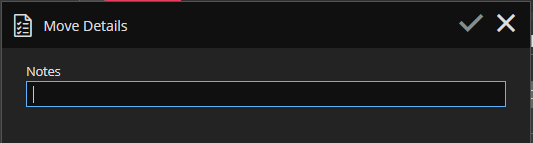
After you have typed in the note, the “CONFIRM” button will be enabled.
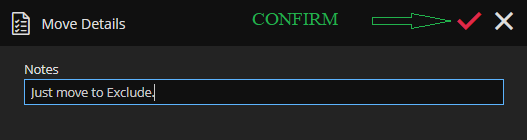
By clicking on “CONFIRM”, the row will be moved to Exclude tab. The same if we want to move to TBD tab.
It should be mentioned that actions Move to Exclude and Move to TBD support multi-select. User can select and move to Exclude/TBD the group of rows.
Action Reevaluate pulls out security data and prices fresh and re-evaluates existing positions. Position information won’t be re-evaluated. That is, the key fields and quantity. When user clicks on Reevaluate the message pops-up saying ”The position remains in Include”.
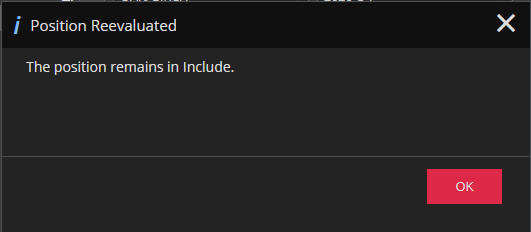
Action Reevaluate also supports multi-select.
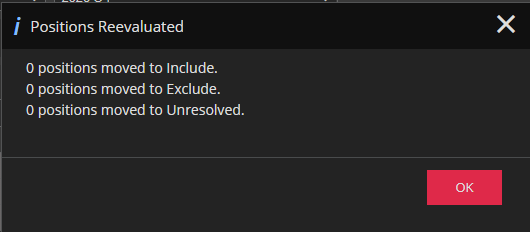
There is another possible outcome when reevaluating a position – position can be completely removed from the Filing. If all the trades booked against some security are canceled then a position will be removed from the report after reevaluation. The user will get the appropriate message as in the screenshot below.
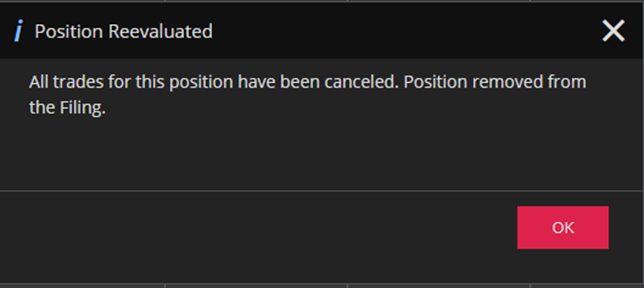
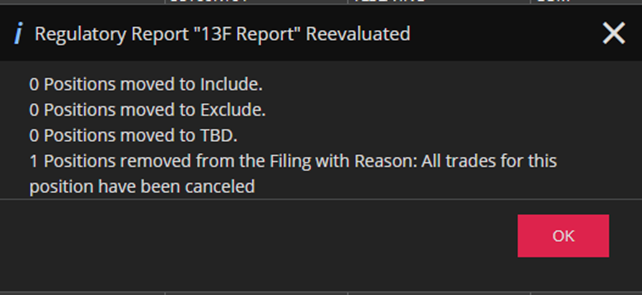
We get the same result by clicking the REEVALUATE button but the message will be a little different as you can see in the screenshot below.
Default grid-view in the Exclude tab has group-by on Reason, Security Type and Enfusion Attribute columns and contains all columns included in the default view in the Include tab.
The Reason column contains explanation why certain position is in the Exclude tab.
In the screenshot below we have an example of populated “move” columns in the Exclude tab.
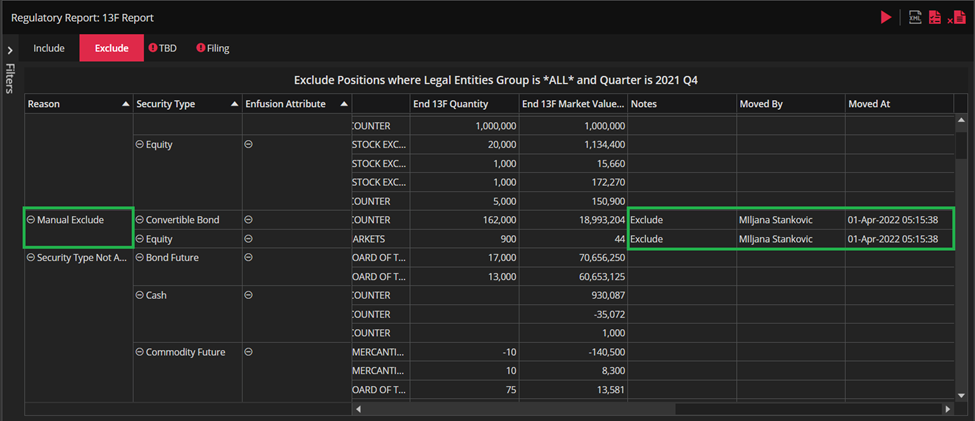
In this case the reason will be “Manual Exclude”.
All actions in the context menu of the Exclude tab are the same as the actions in the context menu of the Include tab. However, the first section, that contains Move to Include, Move to TBD and Reevaluate actions, differs.
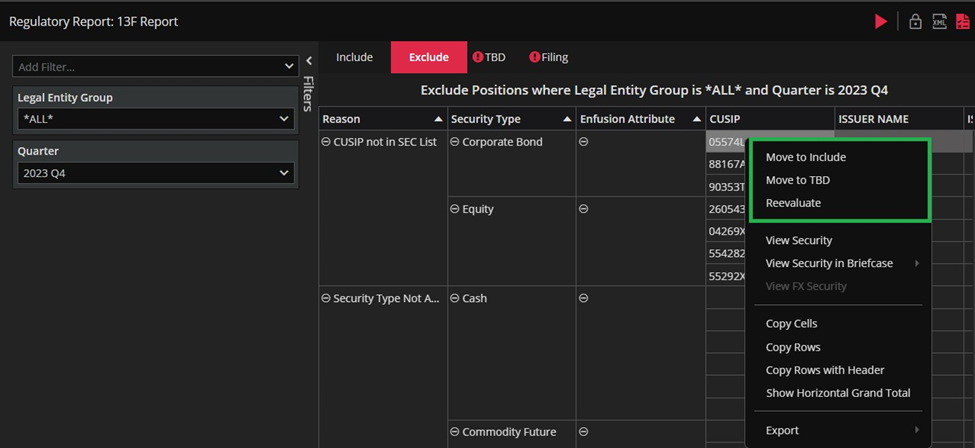
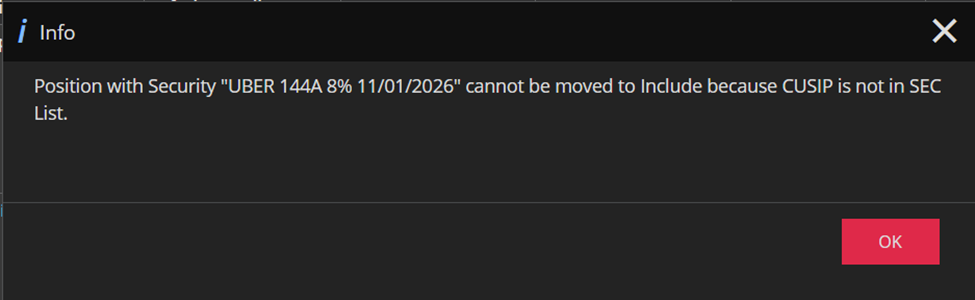
By clicking on Move to Include the Move Details pop up will appear. After the user fills in the Notes field and clicks on CONFIRM button, he will get the appropriate info message why selected position cannot be moved to Include.
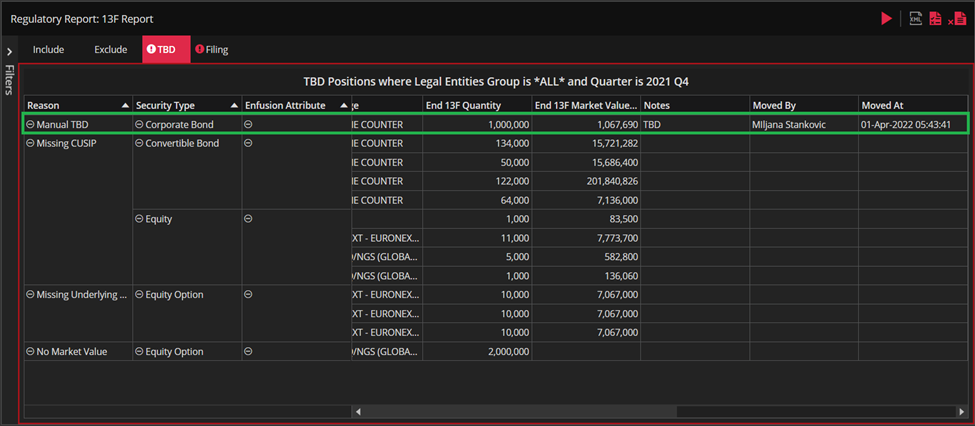
Similarly, by choosing Move to TBD the selected position will be moved to TBD tab with reason “Manual TBD” (see screenshot below).
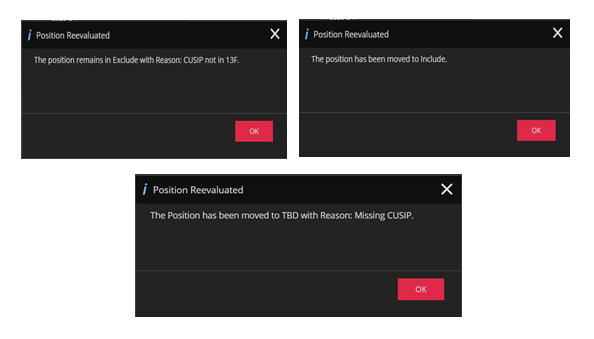
There will be three possible outcomes when you click on Reevaluate in the Exclude tab. The position can remain in the Exclude tab with pop-up message saying that position remains in Exclude with corresponding reason. The position can be moved to TBD tab with pop-up message saying that position goes to TBD with corresponding reason or position can be moved in the Include tab with pop-up message saying ”The position has been moved to Include”.
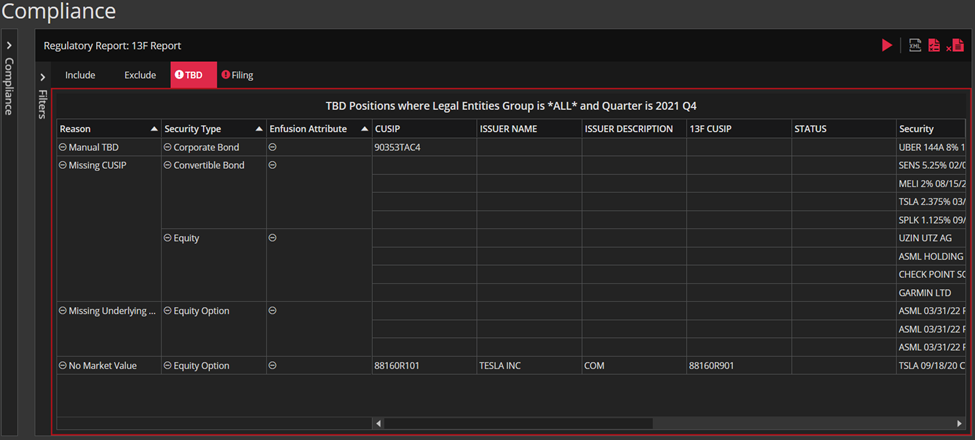
The grid-view in the TBD tab has a group-by on Reason, Security Type and Enfusion Attribute columns.
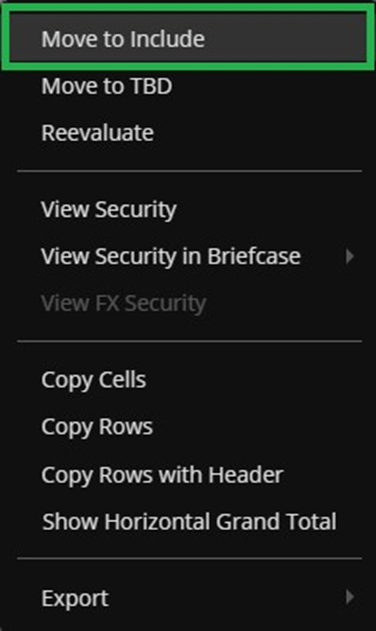
The first section in the context menu of the TBD tab contains actions Move to Include, Move to Exclude and Reevaluate (see screenshot below).
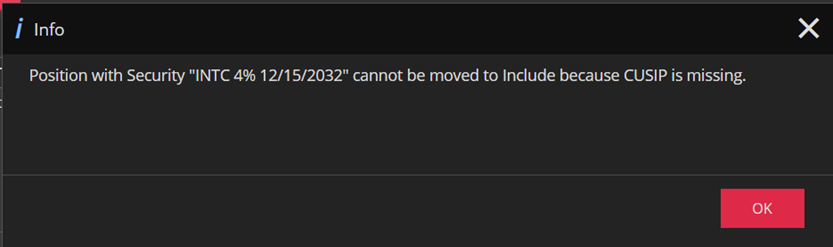
After we click on Move to Include there will be two possible outcomes – position will remain in TBD with appropriate info message or it will be moved to Include. Only positions with reason “Ready to Include” can be moved from TBD to Include tab.
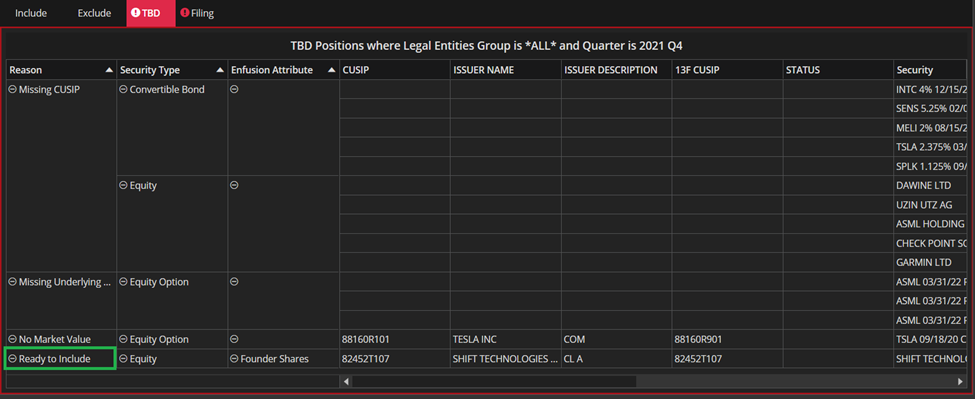
The actions Move to Exclude and Reevaluate in the TBD tab work the same as in the Include tab.
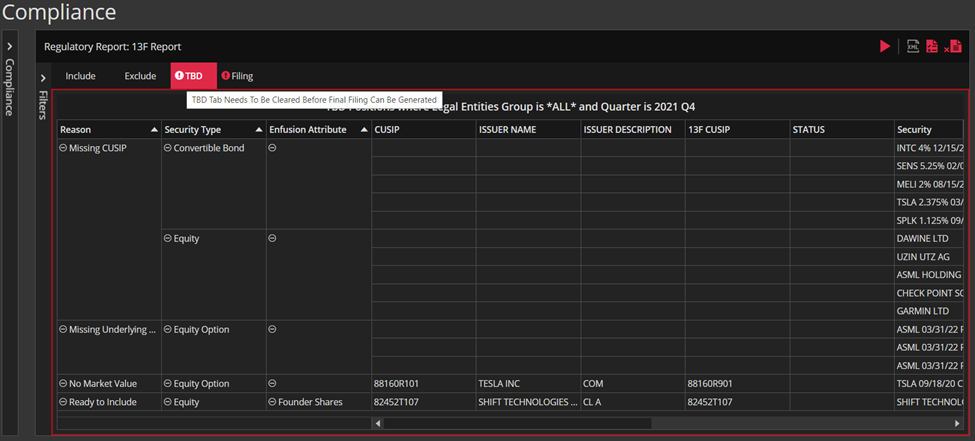
As long as we have data in the TBD tab there will be an exclamation mark in the tab and a red outline inside the tab content for the TBD.
The tooltip on the TBD tab should read: “TBD Tab Needs To Be Cleared Before Final Filing Can Be Generated” as you can see in the screenshot below.
The Filing tab contains all the data from the Include tab collapsed by CUSIP (security identifier).
The default view contains all the columns from the screenshot below.
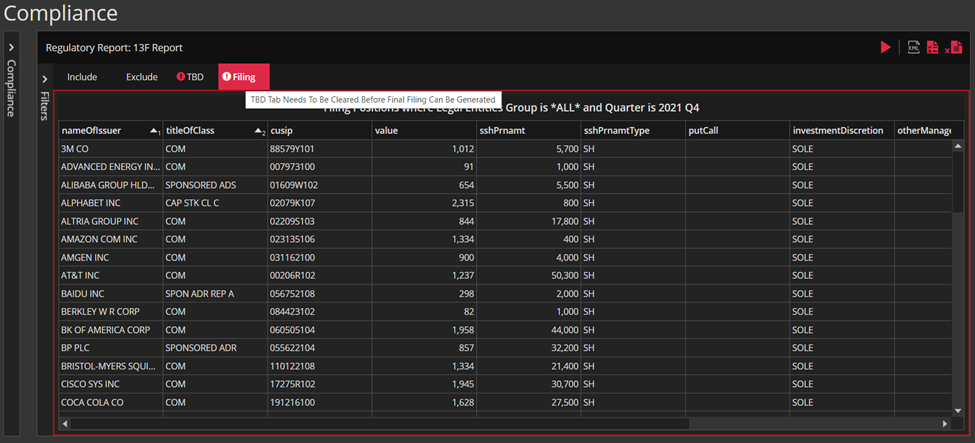
The columns were selected due to the need to generate an XML file by the necessary standards.
Taking into account that we have data in the TBD tab there will be an exclamation mark in the Filing tab and a red outline inside the tab content for the Filing tab. Also, there will be the same tooltip as for the TBD tab.
The user’s goal is to empty the TBD tab by moving data from TBD to Include or Exclude tab.
Once the data has been cleared from the TBD the red border and exclamation mark will disappear both from the TBD and the Filing tab as in the screenshot below.
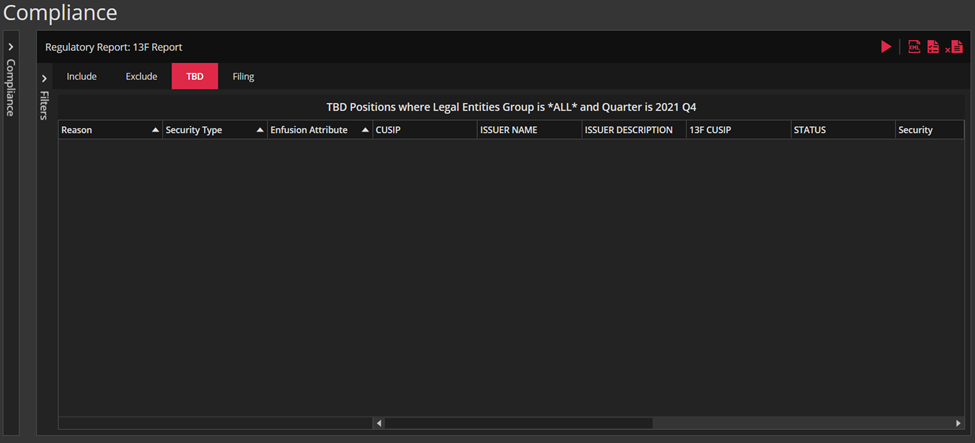
Now, we can generate the submission (XML) file off of the Filing tab by choosing the Generate Submission File action from the context menu in the Filing tab.
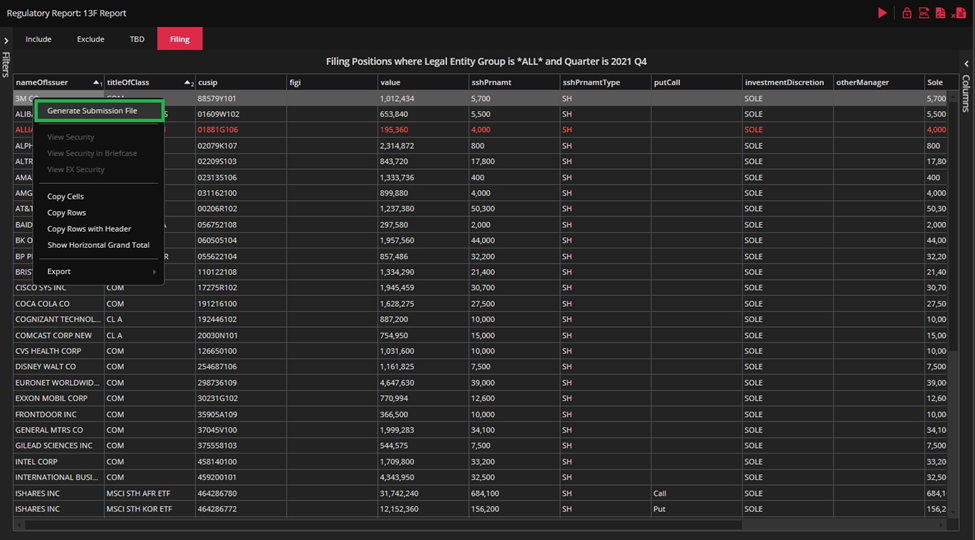
The action Generate Submission File in the context menu will be enabled only if the user has previously cleared the TBD tab.
When TBD tab is cleared then the GENERATE SUBMISSION FILE button in the upper right corner will be enabled.

By clicking on GENERATE SUBMISSION FILE button your XML file will be downloaded.
The action Generate Submission File from the right-click menu in the Filing tab works the same as GENERATE SUBMISSION FILE button.
In the sequel we will consider the 13H Report.
Here we report our Prime brokers and Executing (Clearing) brokers with theirs Organizations.
The 13H Report consists of Include, Exclude, TBD and Filing tab, as in the screenshot below.
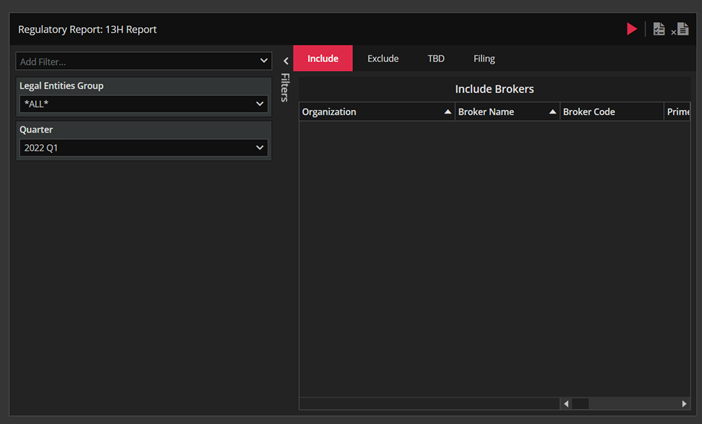
In the pre-filters curtain the user can select the desired group and quarter as we have already explained for the 13F Report.
In the Regulatory Report: 13H Report section the user can have an interactive workflow with brokers for selected group and quarter.
The default grid-view in the Include tab has group by on Organization and Broker Name columns. There are also Broker Code, Prime Broker, Executing Broker, Clearing Broker, Last Trade Date, Notes, Moved By and Moved At columns.
In the upper right corner we have three buttons – RUN, REEVALUATE and CLEAR DATA (only GENERATE SUBMISSION FILE button is missing when we compare it to the 13F Regulatory Report). All the buttons work the same as for 13F Report.
First, the user selects desired Legal Entity Group and Quarter (default set up is group *ALL* and the last quarter). Then by clicking on the RUN button in the upper right corner of the Regulatory Report section the user runs the 13H Report process, populates the 13H Report tuple and populates the data in the Include, Exclude, TBD and Filing tab.
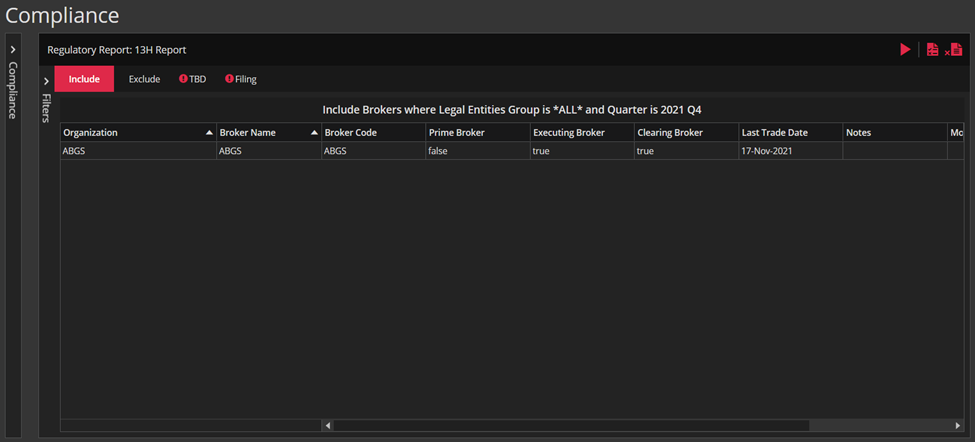
Include tab will consist of all brokers with whom we traded in the selected quarter. For every broker we will have Prime, Executing and Clearing flag (true or false) depending on what roles broker has and last trade date information at the end.
In the screenshot below you can see an example of Include tab that contains data.
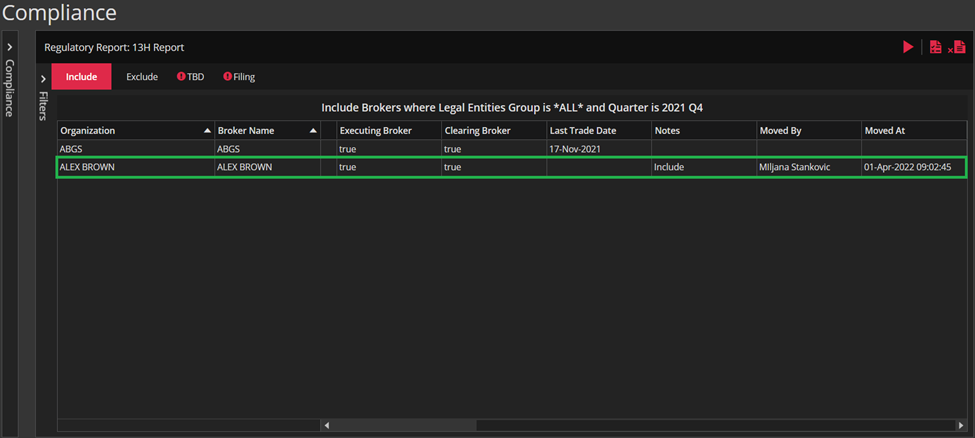
Also, if some brokers are manually moved to Include then the “move” columns will have values as in the screenshot below.
Of course, if there aren’t any trades for selected quarter the Include tab will be empty.
The first section of the context menu in the Include tab has actions Move to Exclude, Move to TBD and Reevaluate.
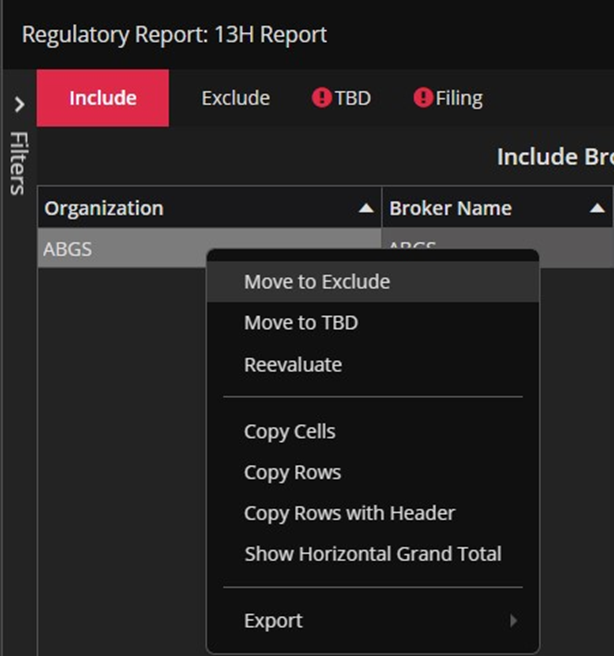
If the user wants to move the row to Exclude or TBD tab he will have to type in the note after he clicks on action Move to Exclude / Move to TBD (the same as for 13F Report).
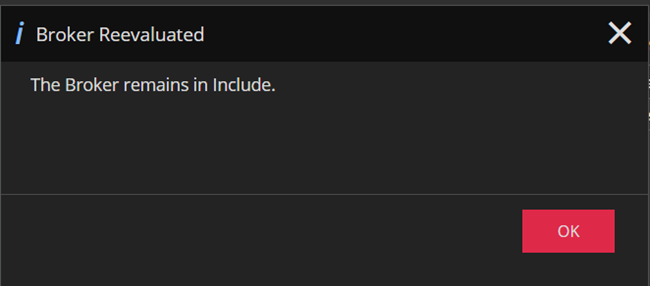
The action Reevaluate gives three possible outcomes-the row remains in the Include, the row is moved to Ecxlude or the row goes to TBD.
Of course, the user will get an appropriate message of what happened to the broker. In the screenshot below is an example of message when broker stays in Include.
It should be mentioned that actions Move to Exclude, Move to TBD and Reevaluate support multi-select.
The remaining actions in the context menu are well known and we have already mentioned them above in the 13F Report part.
Default grid-view in the Exclude tab has group-by on Reason, Organization and Broker Name columns and contains all columns included in the default view in the Include tab plus End Date before Last Trade Date column and Notes, Moved By and Moved At columns at the end.
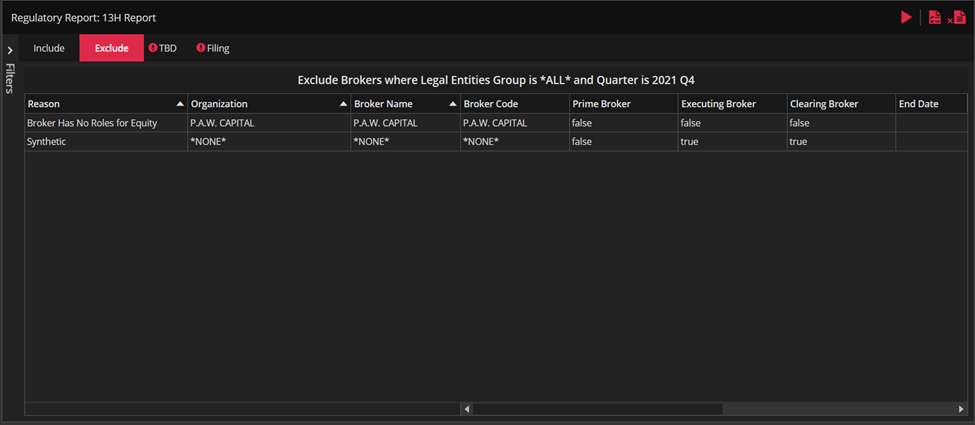
The Reason column contains explanation why certain position is in the Exclude tab.
The columns: Notes, Moved By and Moved At contain information about manually excluded positions. Those positions will be in the Exclude tab with reason “Manual Exclude”.
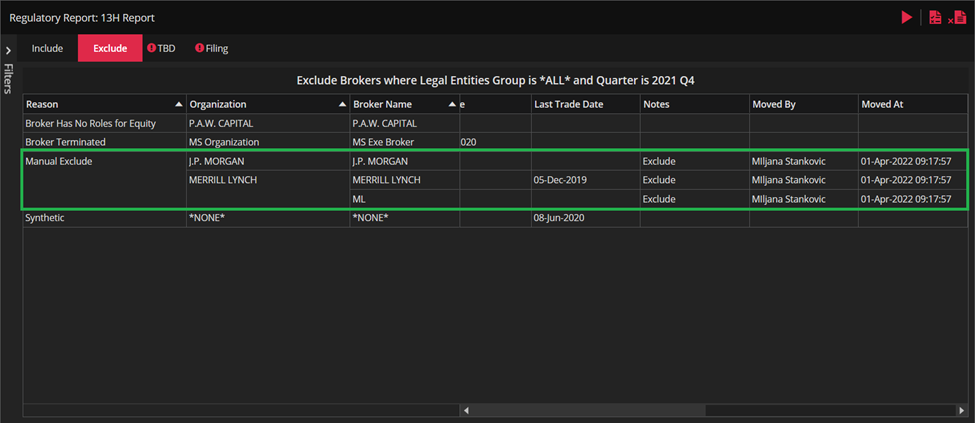
Exclude tab will consist of all brokers that are in the system but have been death-dated before the quarter began (Broker Terminated), Synthetic brokers or brokers that have no roles for applicable security types (Equity, Equity Option, ETF, ETF Option, Convertible Bond, Corporate Bond, Warrant, Right) with reason “Broker Has No Roles for Equity”. Of course there will be manually excluded brokers.
The first section in the context menu of the Exclude tab contains Move to Include, Move to TBD and Reevaluate actions that work the same as actions in the context menu of the Include tab.
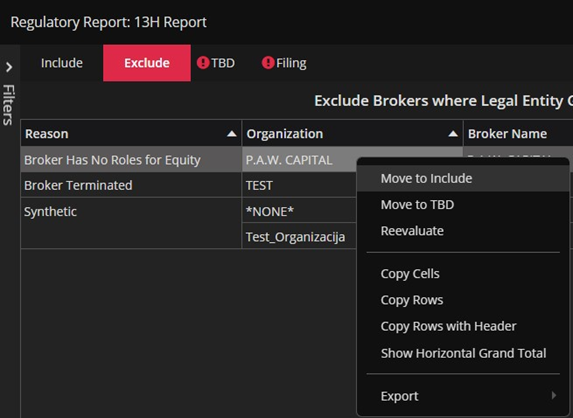
The rest of the actions in the context menu of the Exclude tab are the same as the actions in the context menu of the Include tab.
The grid-view in the TBD tab has a group-by on Reason, Organization and Broker Name columns. The rest of the columns is the same as in the Include tab.
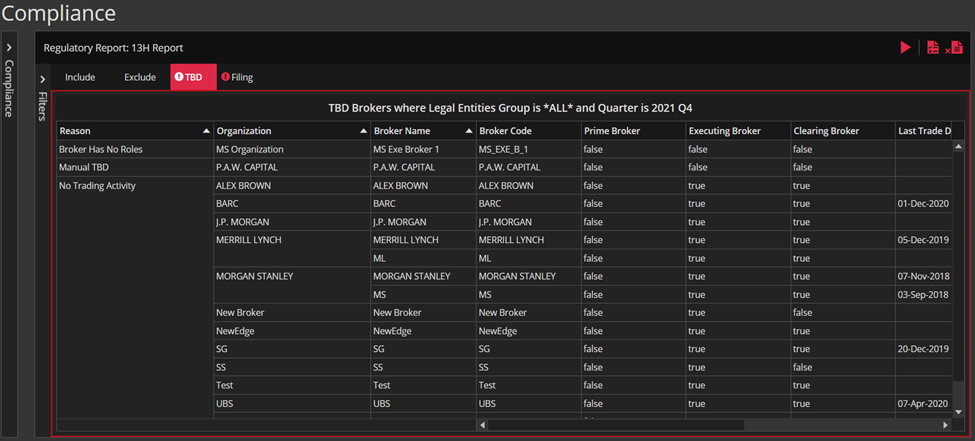
The TBD tab will consist of brokers in the system that are still alive – but with whom we did not trade in selected quarter – No Trading Activity. Also there will be brokers that have no roles and of course the ones that we have manually moved to TBD.
The context menu first section in the TBD tab contains Move to Include, Move to Exclude and Reevaluate actions. All three actions work as already described.
There is a red outline inside the tab content for the TBD and the tooltip as we have already described for 13F Regulatory Report. Only when the TBD tab is empty there will be no red border and tooltip.
And finally the Filing tab should mirror the data in the Include tab but records should be collapsed by Organization for 13H Report.
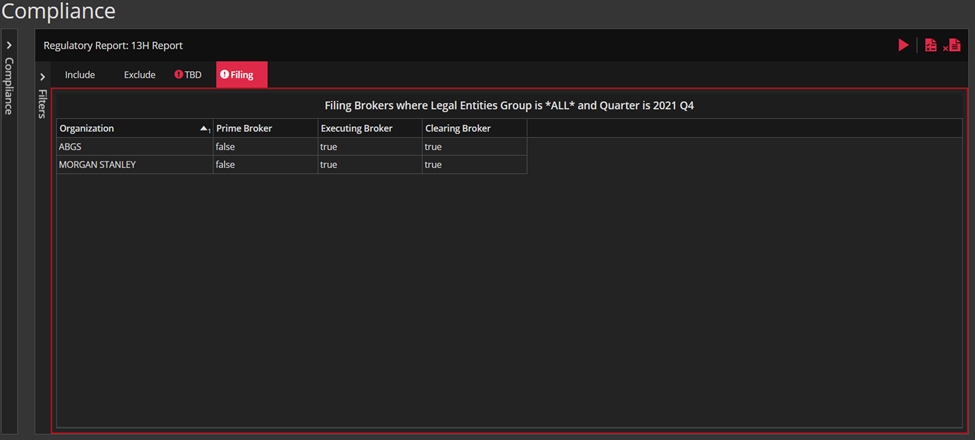
There is no XML file to generate off of the 13H Report. That’s why we do not have Generate Submission File action or a button. The only option here is to export the grid to XLSX file.
As we have already mentioned for 13F Report, the exclamation mark and a red outline inside the tab content for the Filing tab in 13H report will be visible until we clean the TBD tab.
The Securities and Exchange Commission (SEC) schedule 13G form used to report a party’s ownership of stock which exceeds 5% of a company’s total stock issue. The 13G form is intended to provide information about individuals who have significant holdings in publicly-traded companies and thus, allow for other investors and other interested parties to make informed decisions about their own investments. The ownership of over 5% of a publicly-traded stock is considered significant ownership and reporting this to the public is a requirement.
On the other hand, there is Section 16 rule within the Securities Exchange Act of 1934 (SEA) that articulates the regulatory filing responsibilities that directors, officers, and principal stockholders are legally required to adhere to.
According to Section 16, anyone who is directly or indirectly a beneficial owner of more than 10% of a company, or any director or officer of the issuer of such a security, is required to file the statements required by Section 16.
Let us now describe our 13G Report within the Compliance module. Using the RUBY 13G Regulatory Report the user can adjust the Grouping Level and Ownership Threshold parameters to be “Company” and “10” or “Fund” and “5”, respectively. We are just looking at percent ownership of a company or fund.
This way, by adjusting the parameters within the 13G Regulatory Report, the user is going to be able to fulfill the requirements for both 13G and Section 16 Form.
The 13G Report behaves like a Gridview, and thus, includes a Refresh button on the lower right hand side.
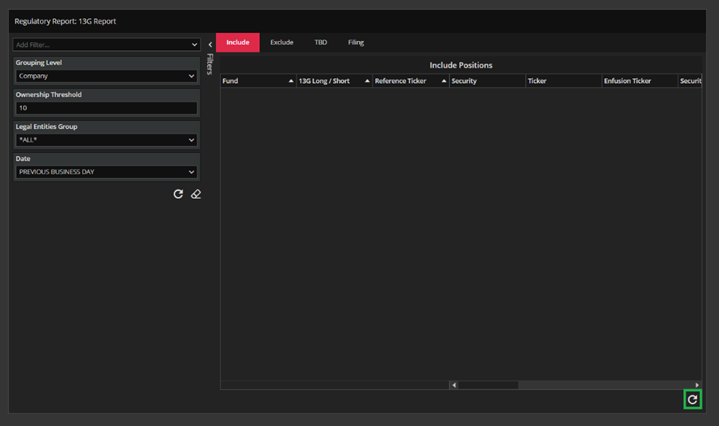
In the pre-filters curtain we have Grouping Level, Ownership Threshold, Legal Entity Group and Date filters. In the screenshot below we can see the default setting.
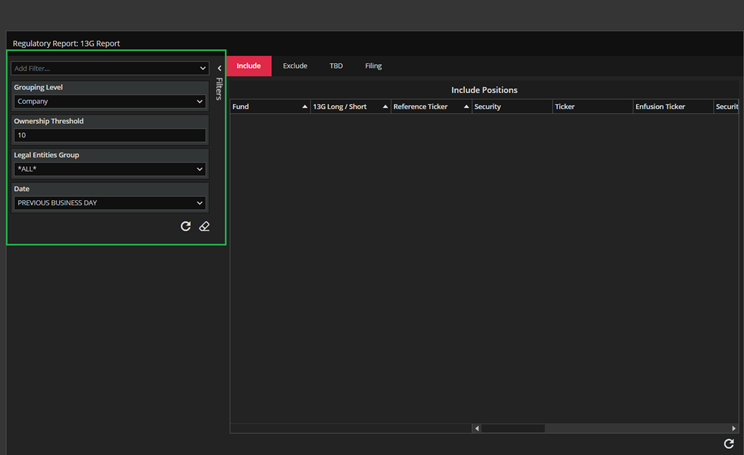
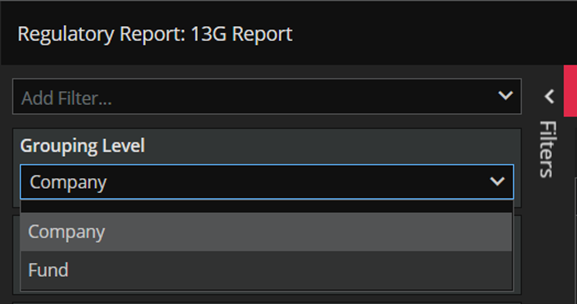
As we mentioned above, the Grouping Level can be “Company” or “Fund”.
The user can type in the desired Ownership Threshold. The minimal value is 1 and maximum value is 100 (see screenshots below).
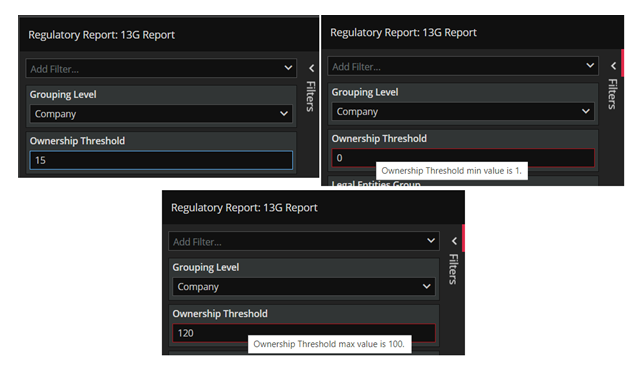
However, if grouping level is Company the default threshold will be 10 and if grouping level is Fund then the threshold will be 5. Of course, the user can change it.
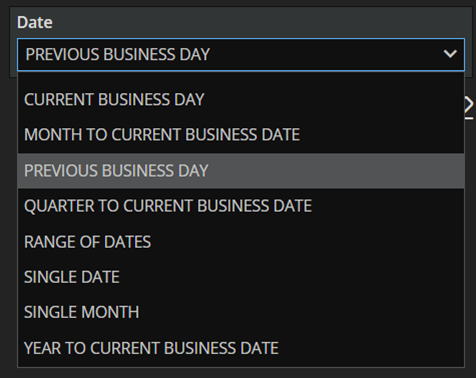
The Legal Entity Group filter is the same as for 13F and 13H Report. The 13G Report can be run every day, not only at the end of the quarter. So, there is no Quarter input. So, we have Date filter that defaults to the Previous Business Day, but also offers other options like a Single Date, Current Business Day, Range Of Dates etc.
Finally, in the pre-filters curtain we have REFRESH and CLEAR buttons marked with green and yellow rectangle respectively (see screenshot below).
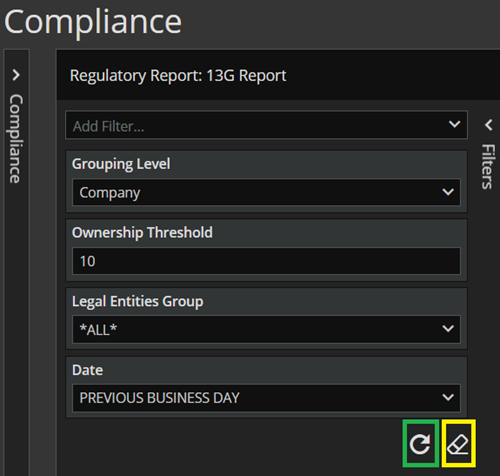
By clicking on CLEAR button all previous parameters settings will be cleared and by clicking on REFRESH button all the grids will be populated with data for selected parameters. Of course, we must correctly select all parameters in order for the REFRESH button to be enabled. The 13G Report consists of Include, Exclude, TBD and Filing tab, as in the screenshot below.
The 13G Report consists of Include, Exclude, TBD and Filing tab, as in the screenshot below.
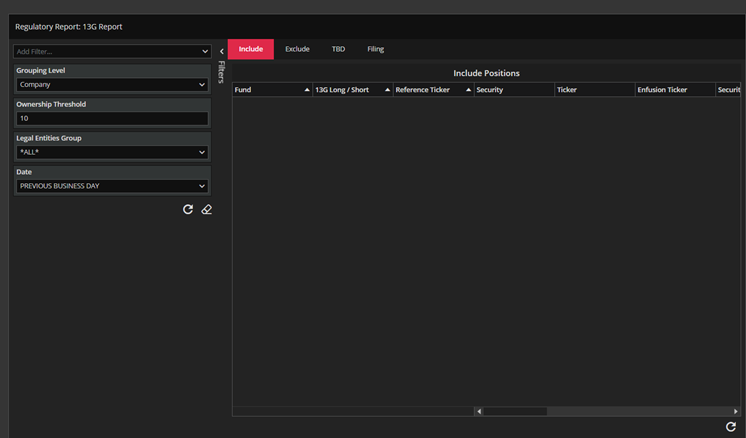
In the upper right corner of the report we do not have any buttons.
We run the report only by clicking on REFRESH button since this regulatory report doesn’t store data in the tuple. After we click on the REFRESH button Include, Exclude, TBD and Filing tab will be populated.
Include tab contains all (long) positions that need to be included in the 13G Report. In the screenshot below we can see an Include tab populated with data.
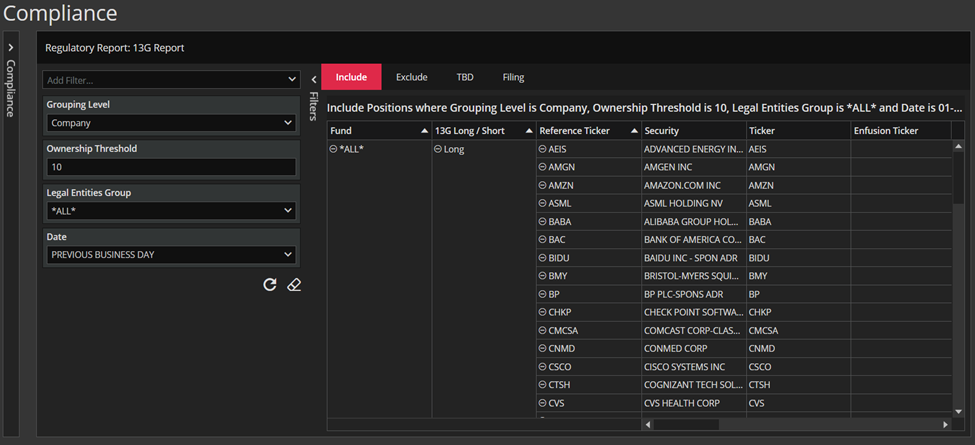
There is a group by Fund, 13G Long/Short and Reference Ticker column. The other columns in a default grid-view of the Include tab are: Security, Ticker, Enfusion Ticker, Security Type, Enfusion Attribute, Start Quantity, Start 13G Quantity, Start Shares Out, Start Shares Out (%), End Quantity, End 13G Quantity, End Shares Out and End Shares Out (%).
Of course, we can add other available columns (13G Multipier, 13G Quantity Change etc) using Grid Editor.
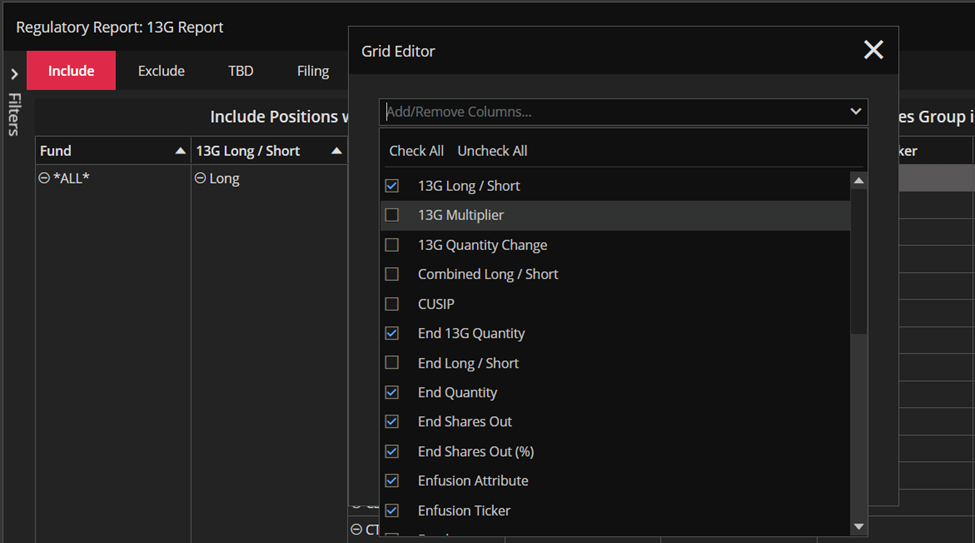
It should be mentioned that if we choose the Fund grouping level then the Fund break will be visible in the Fund column (see screenshot below).
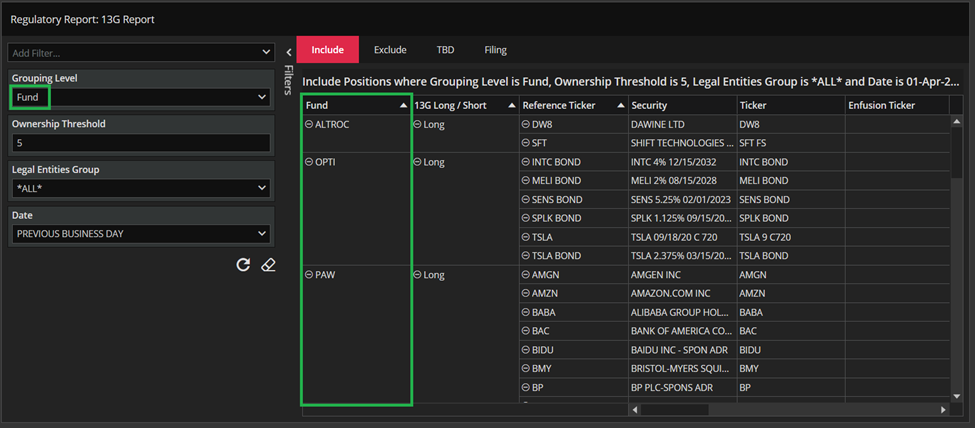
Otherwise, in the Fund column we will read the selected legal entity group.
The context menu in the Include tab contains only the usual well-known actions (see screenshot below).
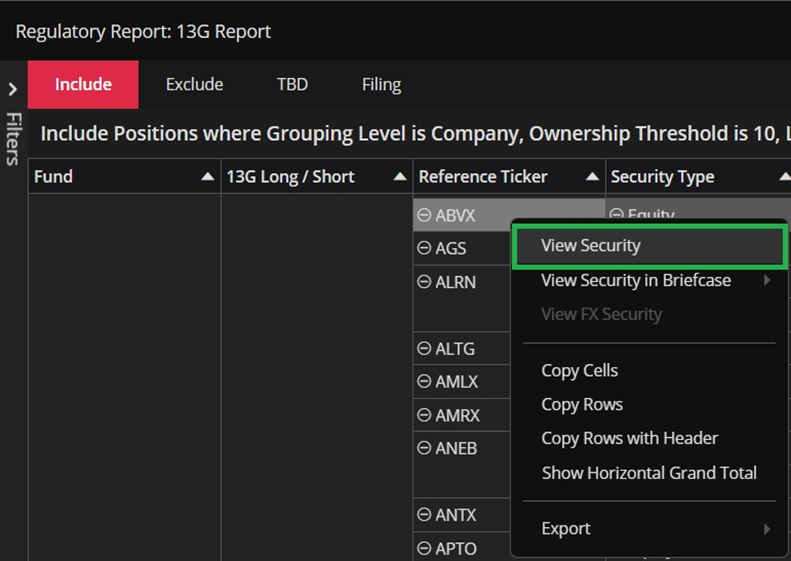
Obviously, for 13G Regulatory Report we do not have “move” actions nor the Reevaluate action in the context menu. So, if we make some changes we will have to run process from scratch.
The positions in the Exclude tab are there for various reasons- At HoldCo, Attribute Not Applicable, Option Type Not Applicable, Security Type Not Applicable, Closed Position and Short Position.
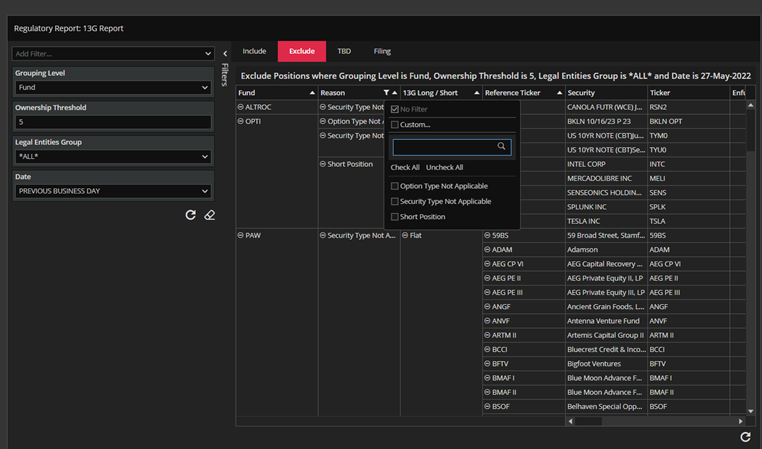
In the default grid-view of the Exclude tab we have group-by Fund, Reason, 13G Long/Shot and Reference Ticker column. The other columns are the same as in the Include tab.
The context menu in the Exclude tab has the same actions as the context menu in the Include tab.
The TBD tab contains the same columns as Exclude tab.
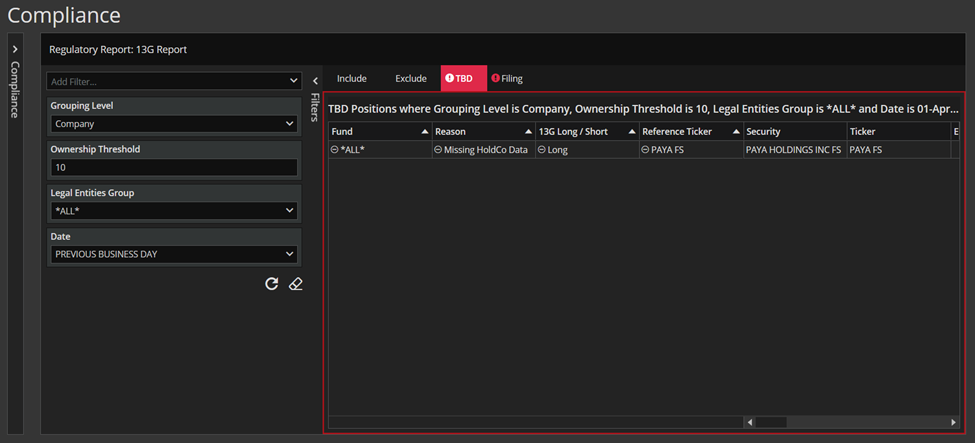
The positions in the TBD tab will land there with reason “Missing HoldCo Data”.
The Filing tab contains the data from the Include tab aggregated by Reference Ticker. The columns in the Filing tab are: Fund, Reference Ticker, Start 13G Quantity, Start Shares Out, Start Shares Out (%), Start Alert Level, End 13G Quantity, End Shares Out, End Shares Out (%), End Alert Level, and Alert Level Change.
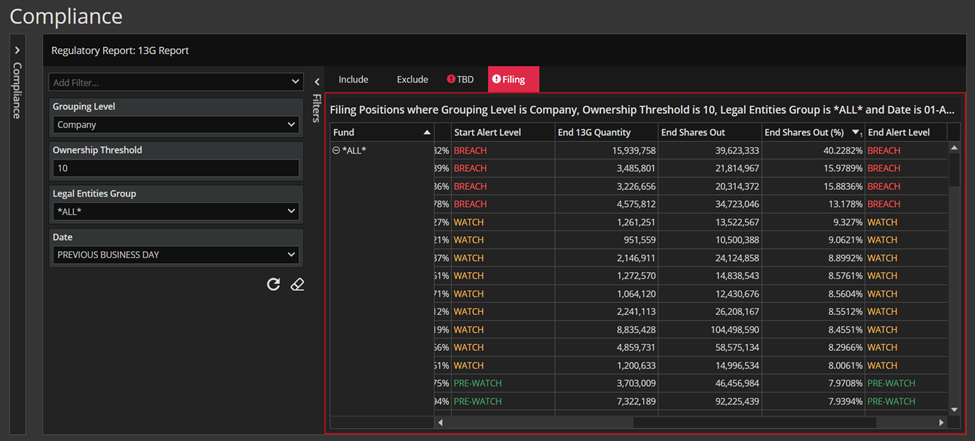
We can add columns 13G Quantity Change, Shares Out Change, Shares Out (%) Change and other columns using Grid Editor in the Filing tab.
The values in the End Shares Out (%) column are in descending order.
Start Alert Level and End Alert Level columns have values and coloring as in the picture above.
If the grouping level is Fund then the alert level over 5% (BREACH) of a publicly-traded stock is considered significant and reporting this to the public is a requirement. If the grouping is Company then BREACH will be over 10%. More precisely, if the alert level is >= 100% of Initial Threshold that’s BREACH.
The Alert Level Change column will be empty if Start Alert Level is equal to End Alert Level. If there is a change, then will show WATCH to BREACH, MONITOR to PRE WATCH, NONE to MONITOR, etc.
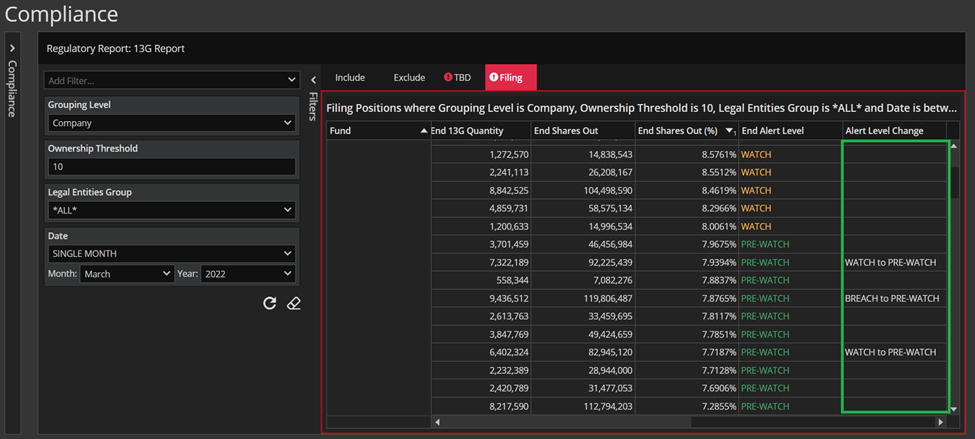
The context menu in the Filing tab contains the usual actions.
Also, there are 13F Compare and 13H Compare Reports. You can use them to compare results between two quarters. Pay attention that the compare reports will return data only if there are differences, otherwise they will stay empty.