
In this section we will describe all the tabs in securities and orders forms. Let us consider Equity security form.
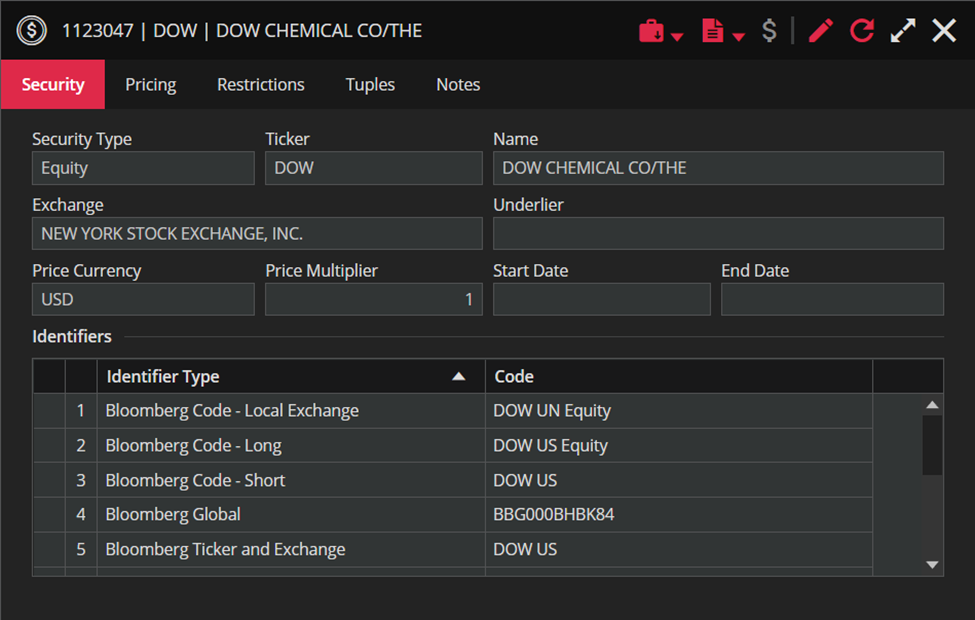
There are five tabs in Equity security form – Security, Pricing, Restrictions, Tuples and Notes tab. All tradable securities have the same tabs in their security forms, except for bonds that have one tab more – Interest tab. We’ll return to Interest tab later.
In the Security tab you can read certain information about security: Security Name, Ticker, Start/End Date etc.
The Pricing tab shows prices for that security starting from default date. Of course, there are Start and End Date filters as well as Valuation Mode and Stress Scenario filters for prices.
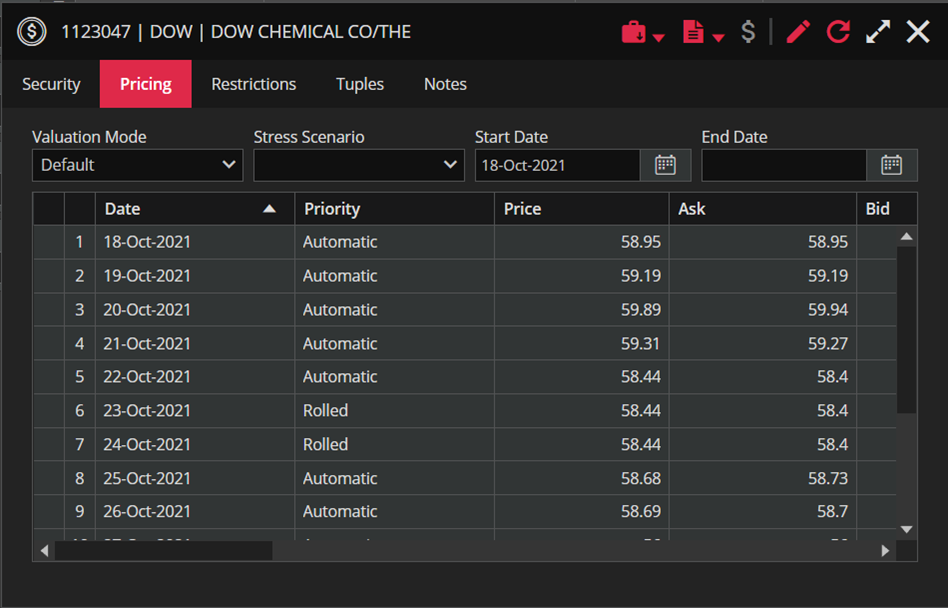
There is an option to add or to remove prices.
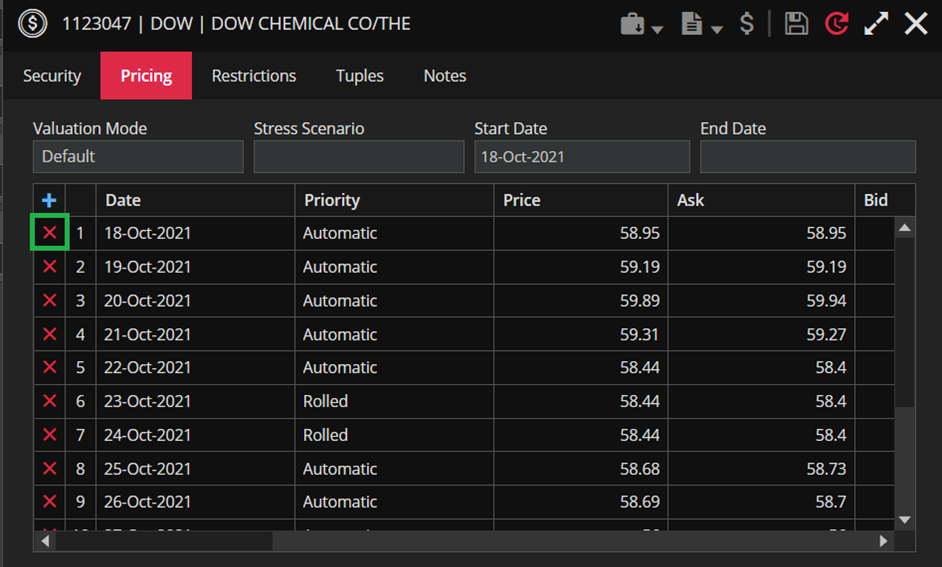
After you click on Edit button in the upper right corner you can remove price for the desired date by clicking on the “X” button marked green in the screenshot below.
You can add new price for a date greater than or equal to Start Date by clicking on the “+” icon marked green in the screenshot below.
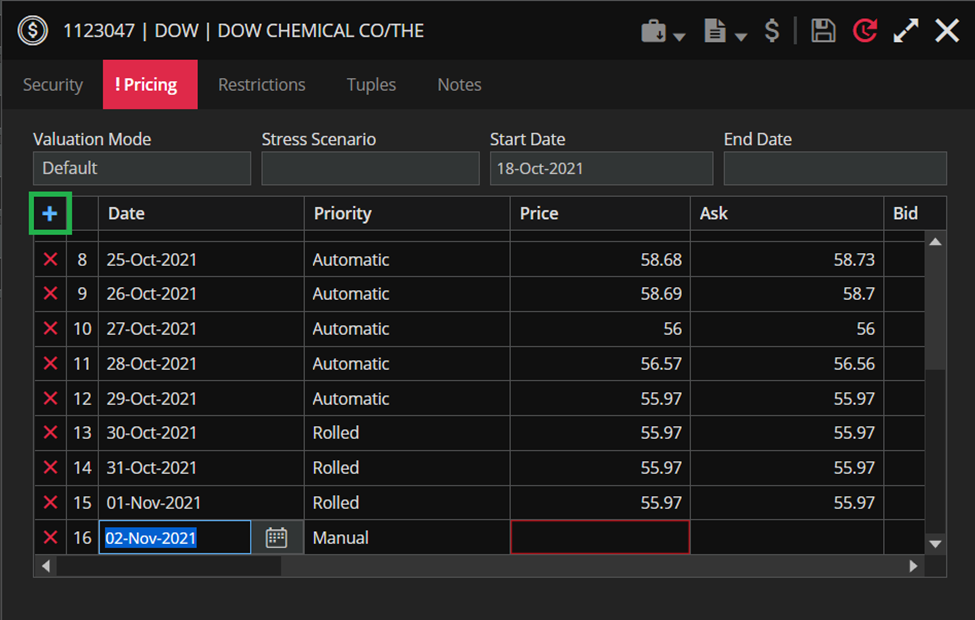
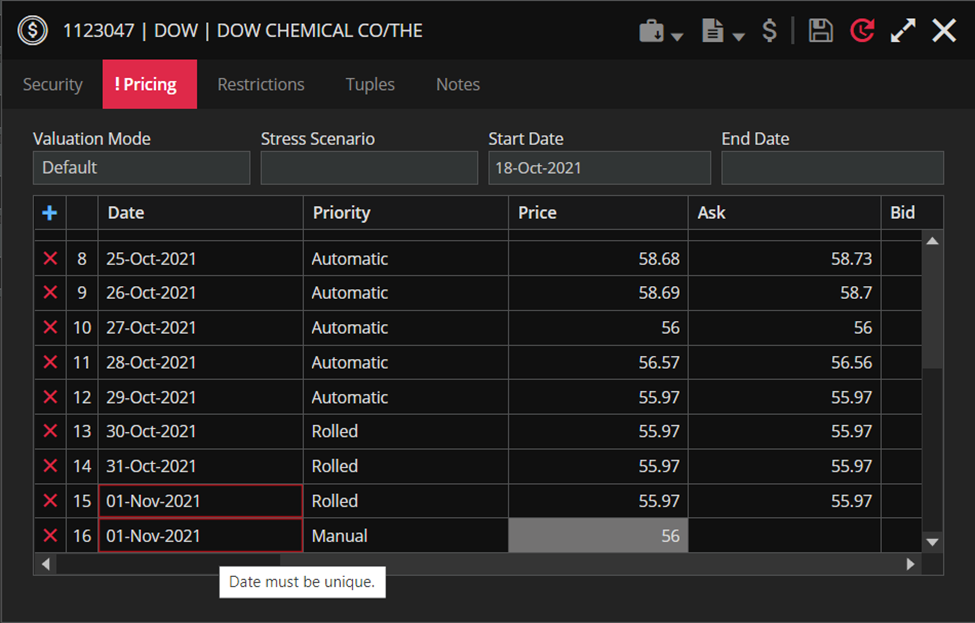
The new row is added with the first available date for which there is no price (it’s 02-Nov-2021 for security from the screenshot above) and price Priority is set to Manual. The Price field is mandatory.
You cannot add date manually for a date for which there is already a price. The red border will appear around the date saying that date must be unique.
There is an option to change Priority from Manual to Automatic or Rolled.
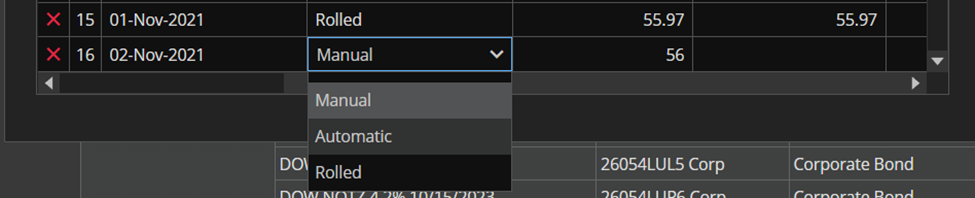
But actually for the price that is added manually the priority should be always Manual.
The prices entered by the ETL process NASDAQ Price Upload FTP have Priority Automatic. On weekends or when it is a holiday and the stock market is closed the Priority for the prices is Rolled.
The process NASDAQ Price Upload FTP honors priority. In other words, the process never overwrites existing prices with Manual priority.
Let us first point out that existing prices have a priority and new prices have a priority (either set by a service or by the user uploading prices through Loader. We will explain below how everything should work.
If the new price has Automatic priority, it can overwrite existing Automatic or Rolled priority, but it cannot overwrite existing Manual priority.
If the new price has Rolled priority, it can overwrite existing Rolled priority, but it cannot overwrite existing Manual or Automatic priorities.
New price with Manual priority can overwrite existing prices of all priorities including existing Manual.
The Restrictions tab goes after the Pricing tab in security form. The purpose of this tab is to flag selected security as restricted.
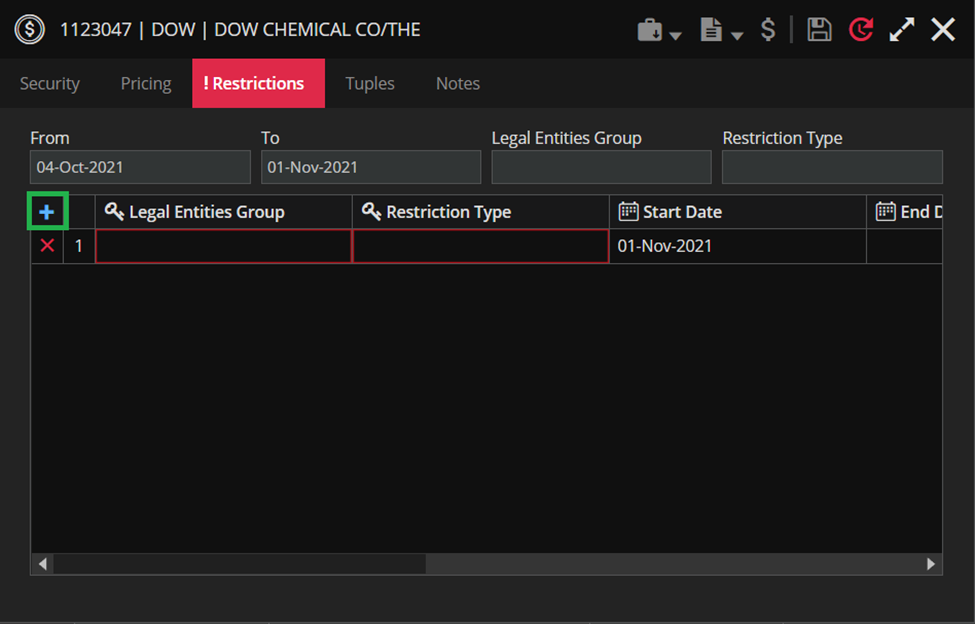
You can add new row in the Restrictions tab by clicking on the blue ‘+’ icon (it’s marked green in the screenshot below).
The Legal Entities Group, Restrictions Type and Contact User are lookups fields. We can select the desired value from the drop-down lists (see screenshot below).
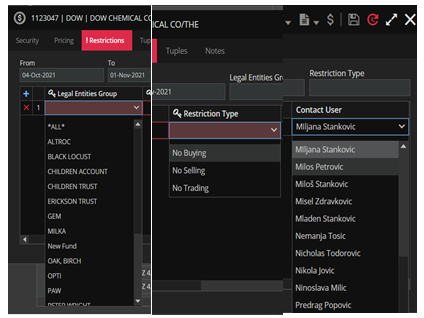
The Legal Entities Group and Restrictions Type are mandatory fields. The Contact User field default value is current user, but the field is not mandatory.
The Start Date of the date range would represent the date when restriction becomes effective and the End Date would represent the day the restriction “comes off”. That would be the Restriction End Date.
The default value when adding a new row in the Restrictions tab for Start Date is today’s date, for End Date is empty (end of times) and for Follow-up Date is Start Date + 30 days (see screenshot below).
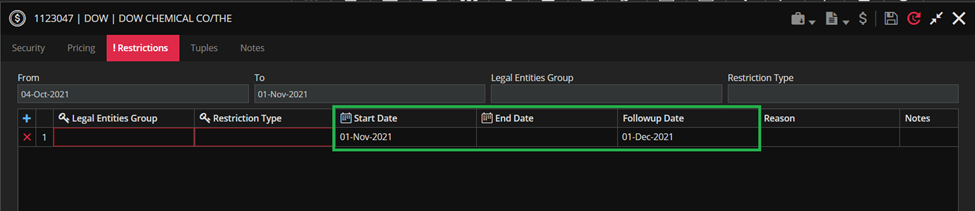
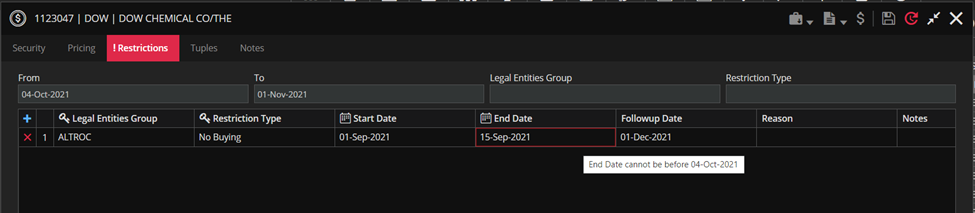
Of course there is the possibility to change the dates as long as we are within the selected time range (the date range is determined by the filters From and To). If we are not in the selected date range, a validation error and tooltip will appear as in the screenshot below.
We can populate the Reason and Notes fields, but it isn’t required.
In the screenshots below we can see the Restrictions tab with few rows of data.
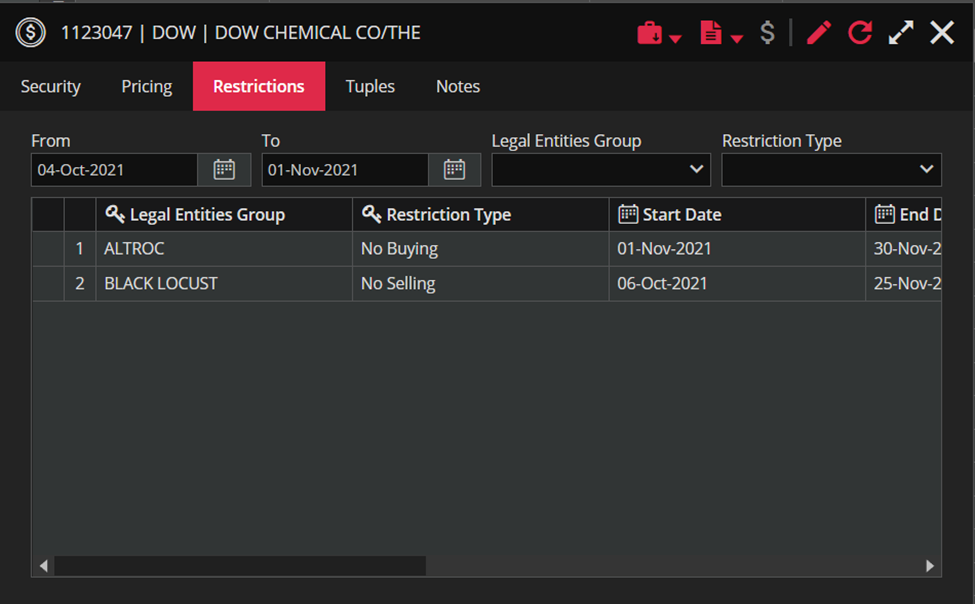
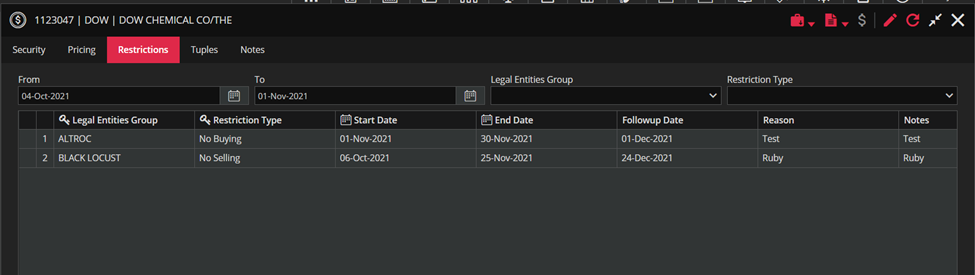
The Restrictions tab has filters for Start Date (From), End Date (To), Legal Entities Group, and Restriction Type with similar filter layout as in the Market Values tab. The restriction data goes into a Restricted List tuple similar to Market Values.
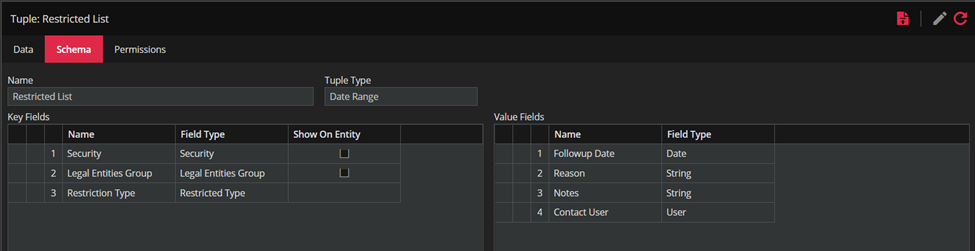
As we can see in the screenshot above key fields are Security, Legal Entities Group and Restriction Type, and it’s of tuple type Date Range. Other values we need are Followup Date, Reason, Notes, and Contact User.
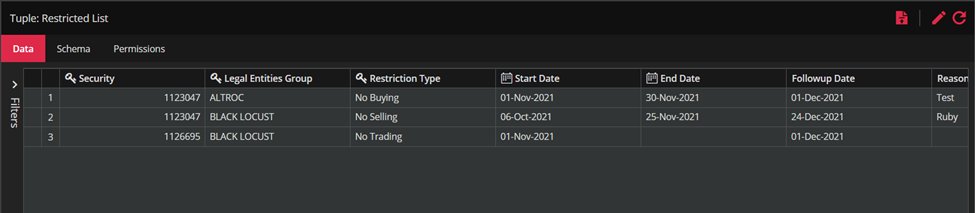
In the Data tab of the Restricted List tuple we will have restriction data that we already added in the Restrictions tab of security form as described above.
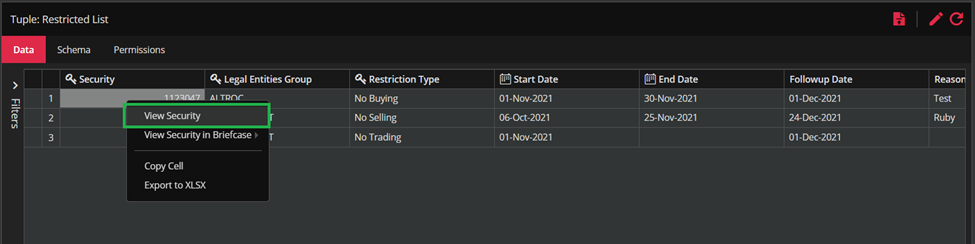
By performing right-click action on the Security field in the tuple and choosing View Security option, we can see security form directly from the tuple. Furthermore, by navigating to the Restrictions tab we can see the restriction data.
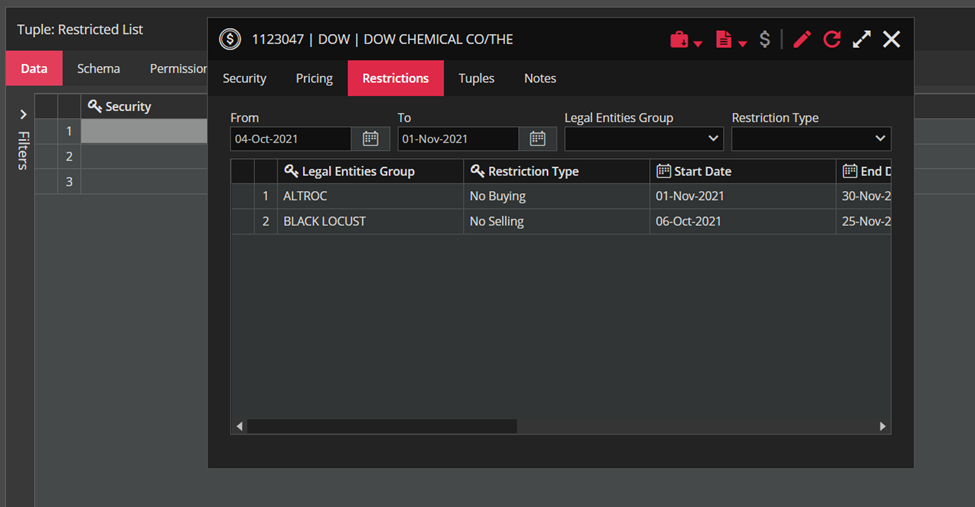
Any change in the Restrictions tab will be reflected in the Restricted List tuple and vice versa.
It should be mentioned that we can add a restriction directly to the Restricted List tuple and it will appear in the security Restrictions tab (see screenshots below).


Restrictions can apply to any type of securities although in most cases, we would have restrictions on equities.
In the Tuples tab, you can see all the data dragged from different tuples and related to that security. The tuple names are in the first column marked with green in the screenshot below.
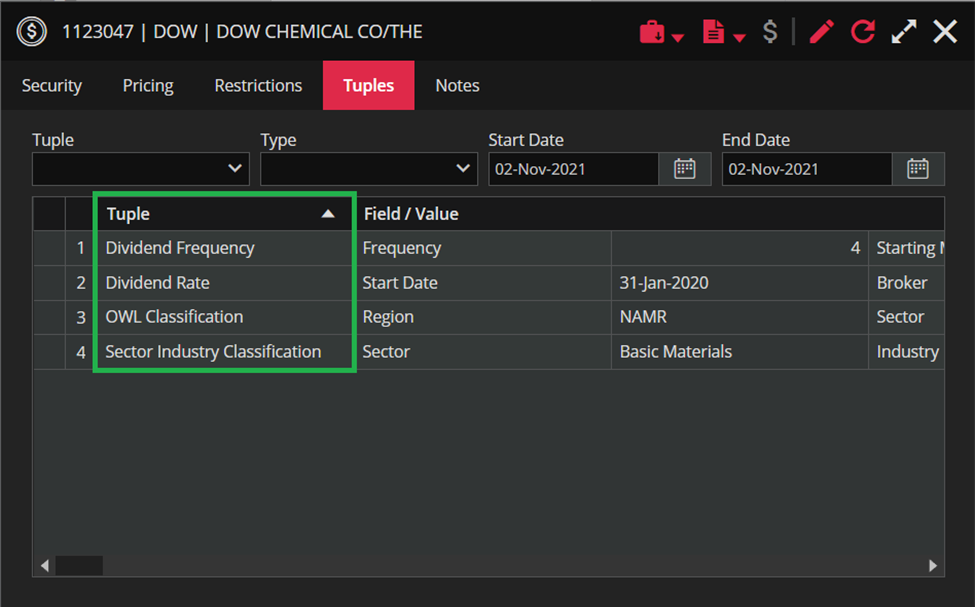
By entering in Edit mode we can edit data in the enabled fields of the Tuples tab.
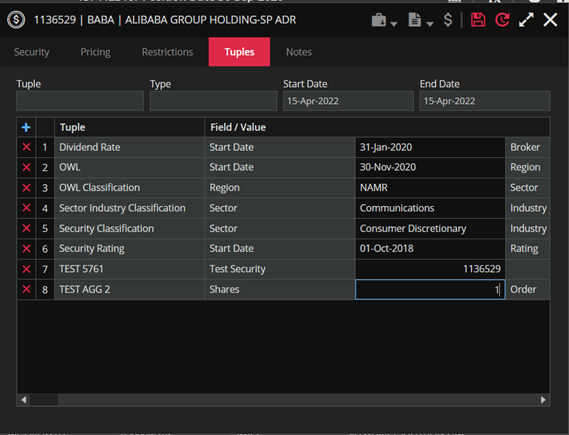
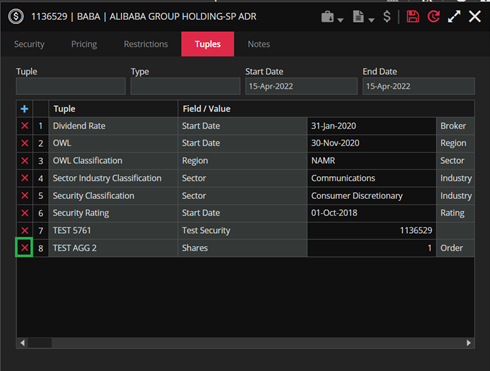
If we want to remove the row from the Tuples tab, we need to click on the red “X” button (see screenshot below).
If we want to add a new Tuple then we need to click on the blue “+” icon marked with green rectangle in the screenshot below.
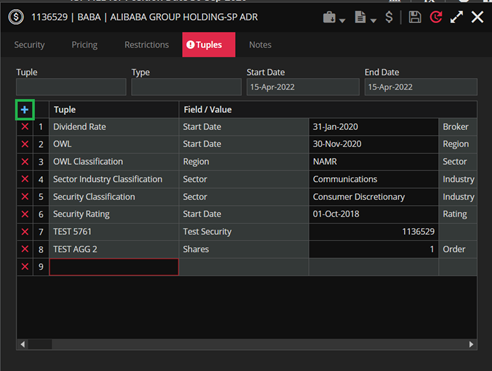
We select the desired Tuple from the dropping menu.
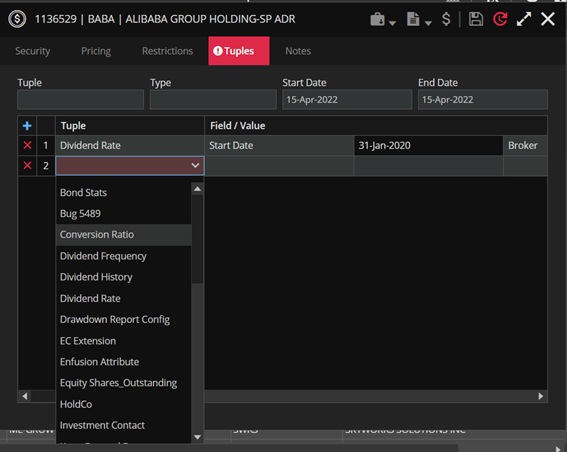
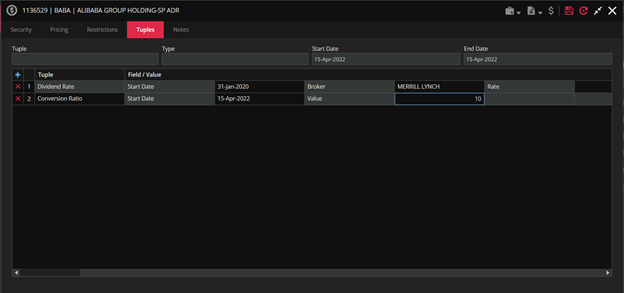
After adding a tuple, some data will be populated by default and some can be populated by the user (not mandatory).
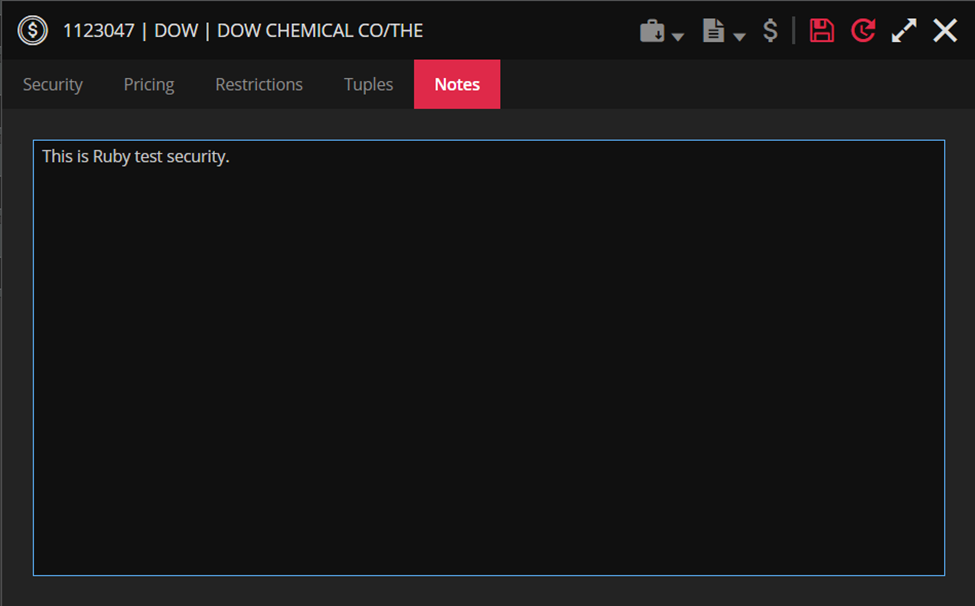
The Notes tab consists of white paper where user can type text when the form is in edit mode. The entrance is limited to 2500 characters. Also, this content should be available in Pre and Post-filtering sections as a column named Security Notes.
The security form for bonds contains the Interest tab. There are two subtabs – Accrued Interest and Coupons. Let’s clarify these terms.
Accrued interest is the amount of interest earned on a debt, such as a bond, but not yet collected. Interest accumulates from the date a loan is issued or when a bond’s coupon is made.
A bond represents a debt obligation whereby the owner (the lender) receives compensation in the form of interest payments. These interest payments, known as coupons, are typically paid every six months.
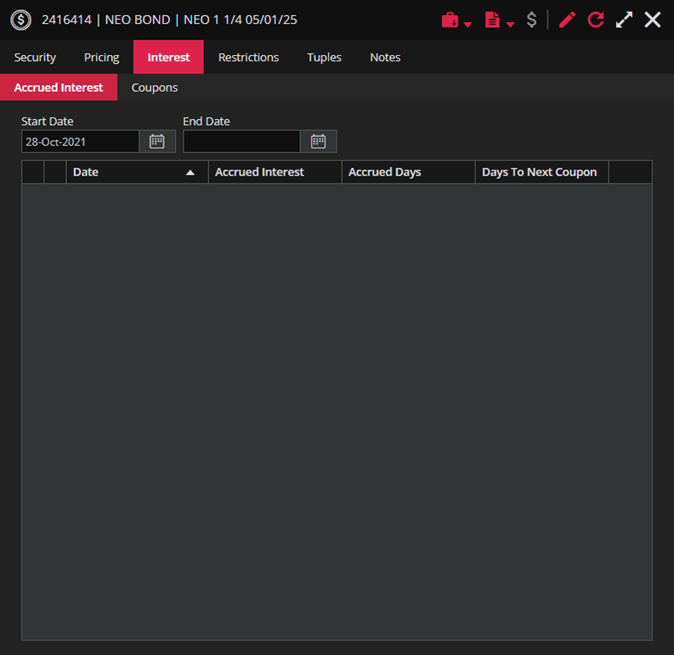
In most cases the grid in the Accrued Interest tab is empty, but you can regenerate data in the following way: enter the Edit mode, perform a right click on the grid and choose action “Regenerate Accrued Interest” (see screenshot below).
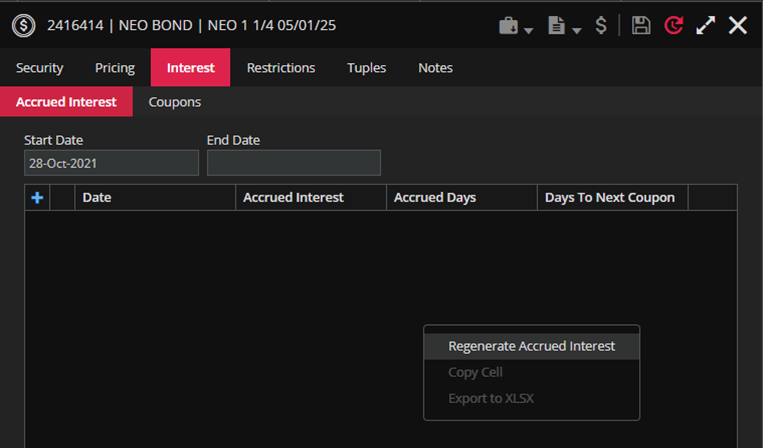
After you click on action “Regenerate Accrued Interest” the pop-up window will appear asking you to confirm the date range (the time period of previous seven days is set by default, but of course you can change it).
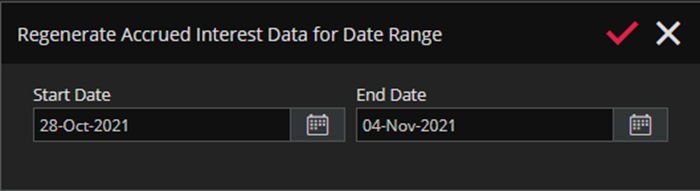
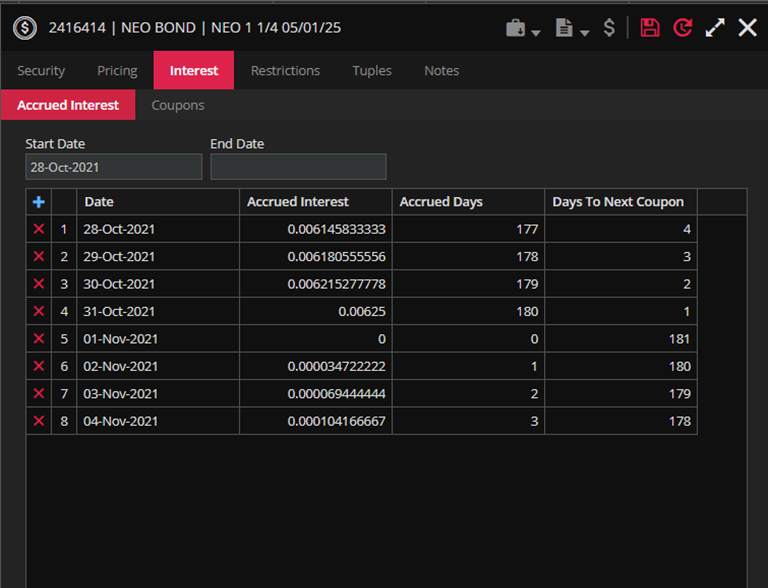
By clicking on APPLY button the grid will be populated with data after which you can save the changes.
If it is necessary or if you just want to regenerate data for a certain time range, you can repeat the procedure described above in the Coupons tab by choosing action “Regenerate Coupons” from the right-click menu on the grid.
On the other hand, security form for investable securities instead of Pricing tab has Market Values tab which contains market values for selected security.
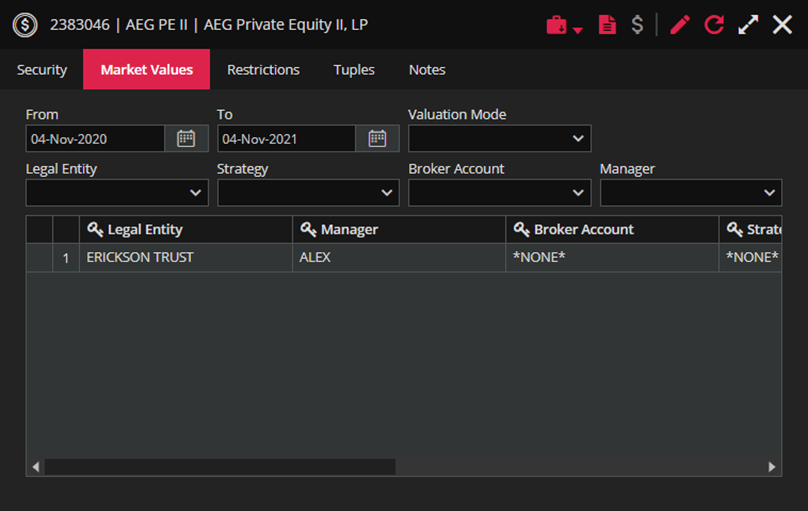
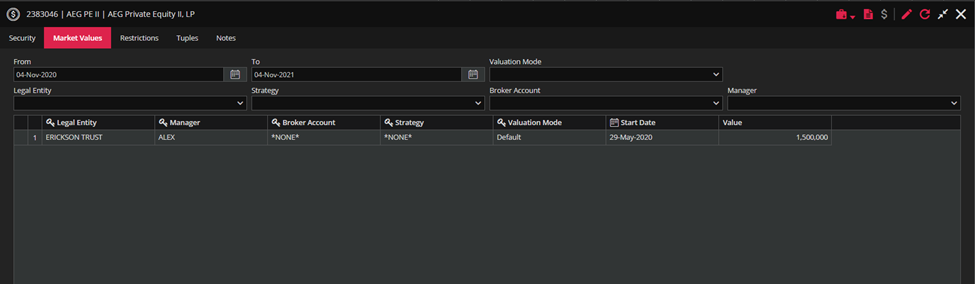
There is an exception with Environmental Credit Project form that is investable and has only Security, Restrictions, Tuples and Notes tab.
The tabs in the order forms are very similar which is described in the sequel.
There are three tabs in forms for all order types (trades, cashflows, investments and repos): Order, Tuples and Notes tab.
The only exception is investment order with side Purchase Agreement booked against Environmental Credit Project security that has an extra tab- Schedule tab.
The Purchase Agreement investment order cannot be booked against other investable securities.
Other exception is trade order with Audit Trail tab that shows you all versions of created order.
The Order tab contains all trading information: Side, Quantity, Trade Date etc. From here you can access the security form for security against which trade is booked.
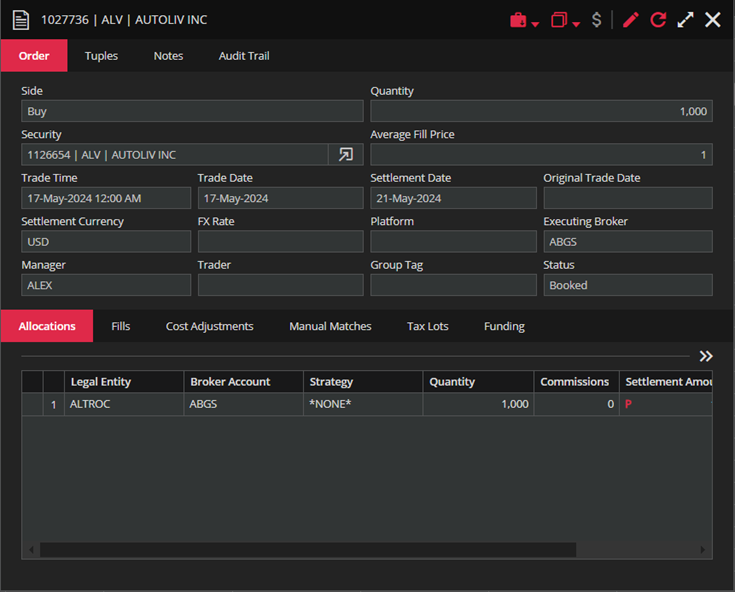
Tuples and Notes tabs work the same as in security form which is described above.
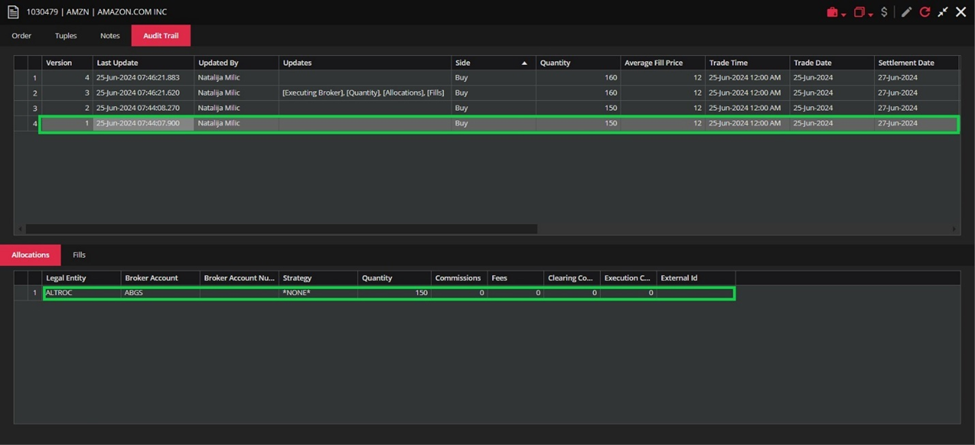
The Audit Trail tab contains details of all changes that happens in order form. When you first create an order and navigate to this tab, there will be two rows, first row represents creation of order, and second row represents time when lots are generated.
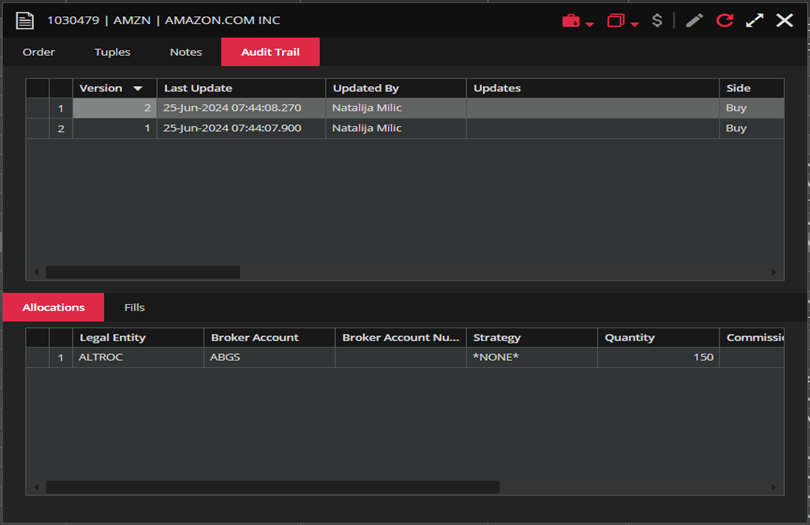
When order is updated, changes will be reflected in Updates tab and there will be two new rows.
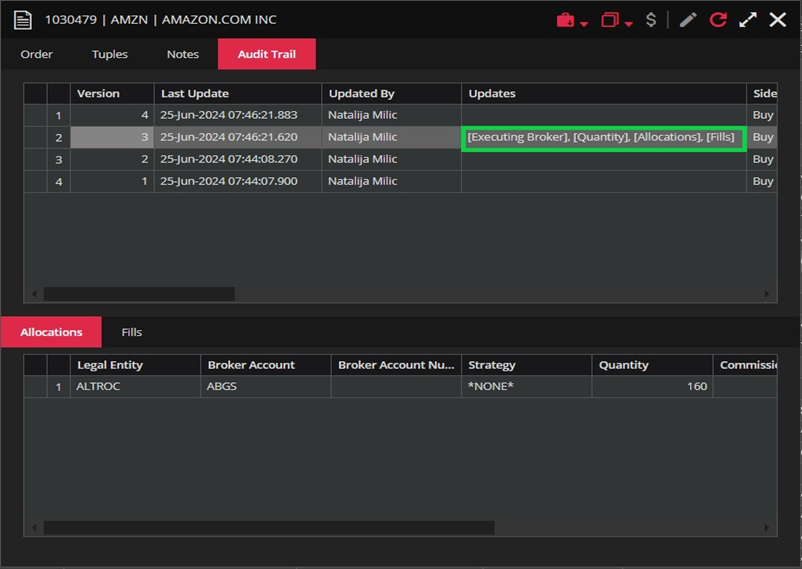
In the second gridview you can see selected version of your order. Same goes for Fills tab.
The Schedule tab contains details of orders placed using the purchasing booking flow recognized by the system. You can schedule your orders for delivery on your required dates.
You have an option to add new Schedule in the Schedule tab by using the “+” icon marked green in the screenshot below.
Let us clarify in the sequel the fields in the Schedule tab.
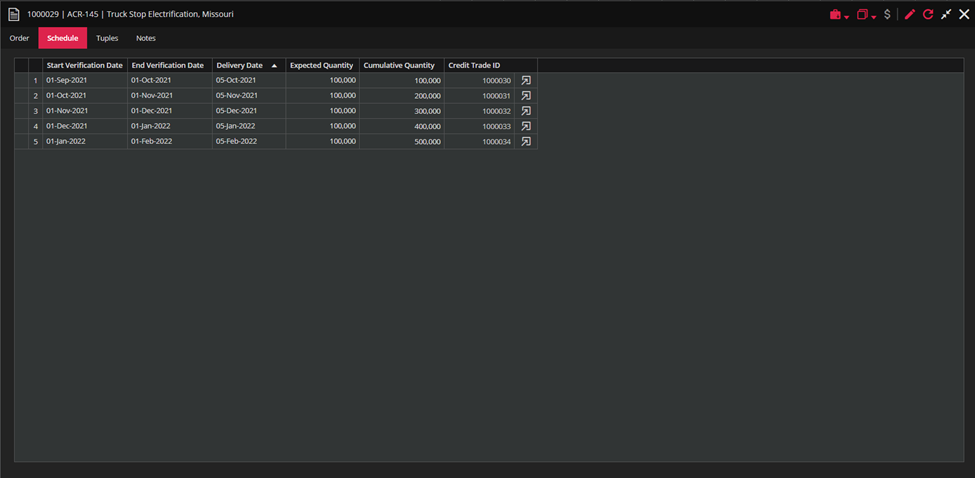
End Verification Date column is driving the logic about which Vintage should be defaulted. The Vintage or “vintage year” refers to the milestone year in which the first influx of investment capital is delivered to a project or company. This marks the moment when capital is committed by a venture capital fund, a private equity fund or a combination of sources.
In this case, Verification period and Vintage are the same. Vintage is usually expressed as the year in which verification period ends. For example, for the first row in the screenshot above Vintage would be 2022.
Delivery Date is going to default the Trade Date we will book of off this form.
Expected Quantity is quantity you schedule and Cumulative Quantity is the sum of all expected quantities.
The Credit Trade ID field contains Order Id of trade booked against Environmental Credit.
Initially, the Credit Trade ID field is empty. There is an option Book Trade in the right-click menu on the Credit Trade ID field (see screenshot below).
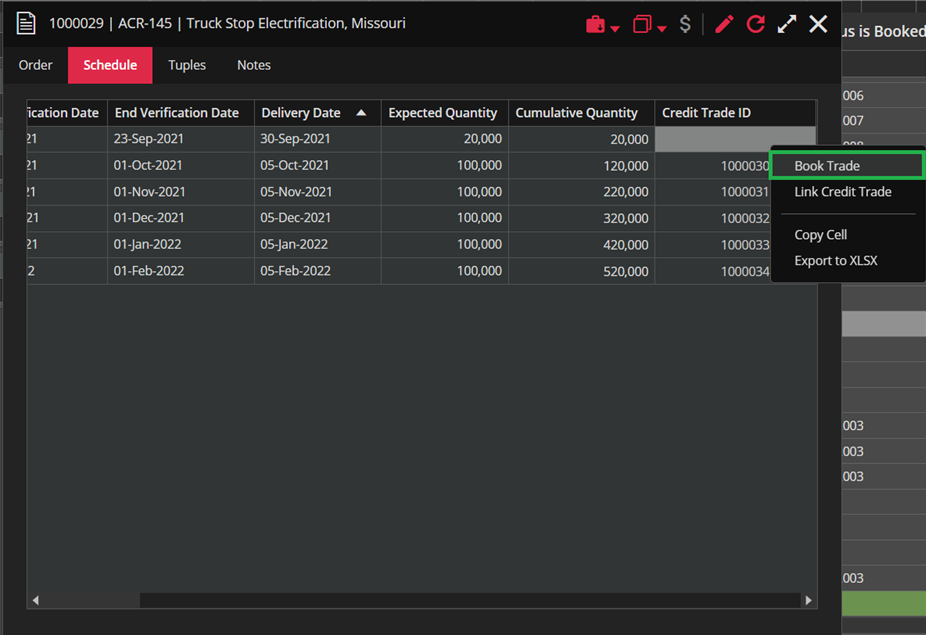
After you choose Book Trade the Select Issuance window will pop-up and you can make your selection from the list. There will be offered only issuances linked to the project against which you have booked the Purchase Agreement order.
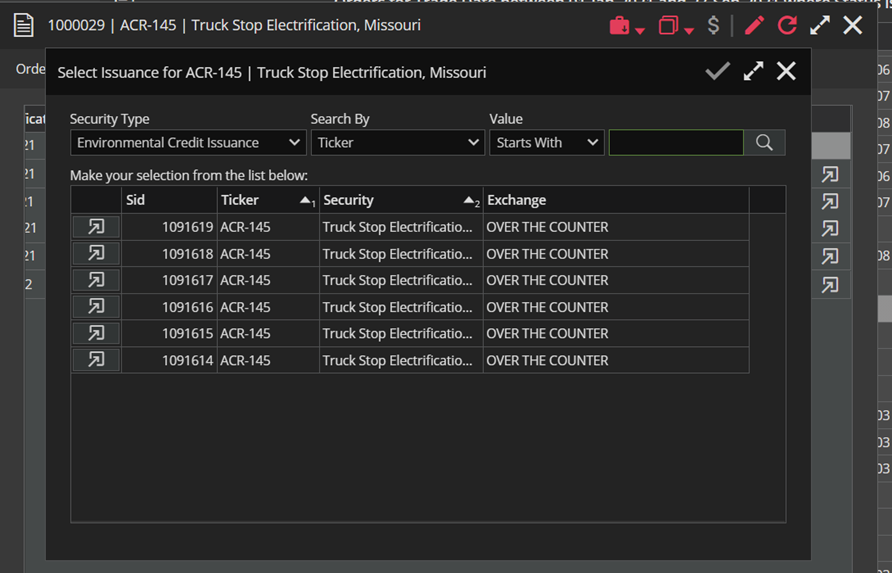
By selecting one issuance the New Order form will appear. The order will be booked against new security type – Environmental Credit which is created automatically for these purposes. The Quantity, Trade Date and Settlement Date fields will be copied from the Schedule tab. The Quantity is copied from the Expected Quantity field and Trade Date is actually Delivery Date. The settlement date is equal to trade date.
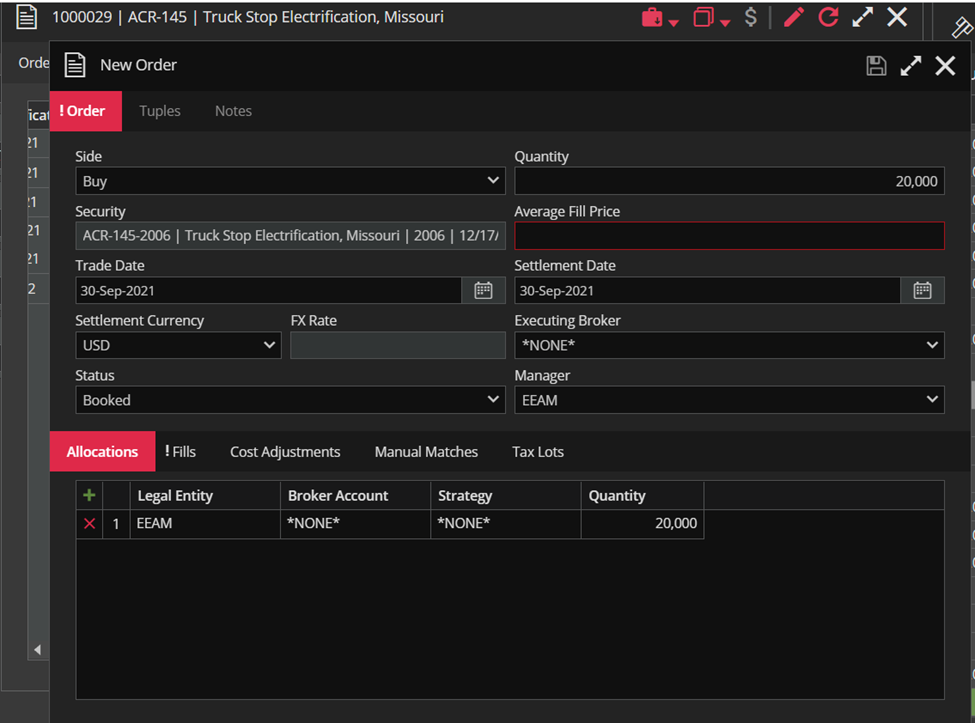
After you populate the price you can book trade. Then the Credit ID field in the Schedule tab will be populated with Order Id of the order that you just have booked. This is how you linked the order.
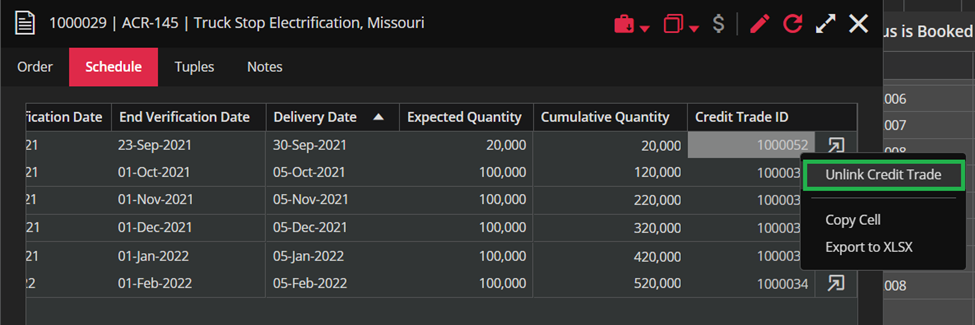
You can unlink the order using the Unlink Credit Trade action from the right-click menu on the Credit Trade ID field (see screenshot below).
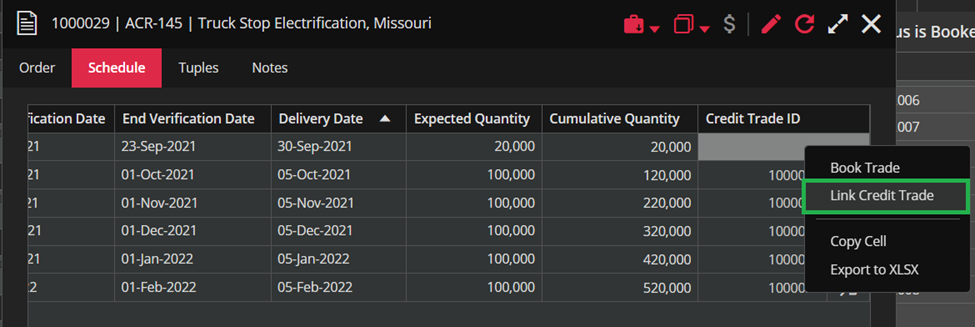
Of course, you can link it again using Link Credit Trade action (see screenshot below).
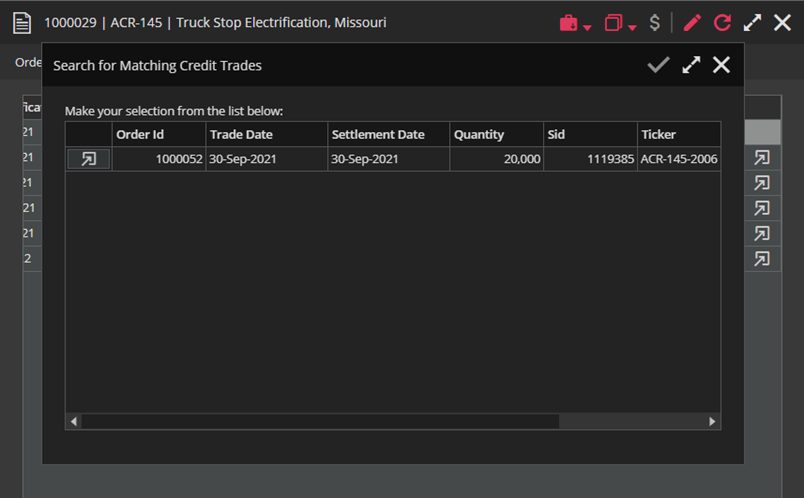
When you click on Link Credit Trade the Credit Trade that you just unlinked will be offered and you will be able to link it again (see screenshot below).
However, in the bottom section of the Order form there are several tabs. The number of tabs varies depending on order type and trades also depend on security type.
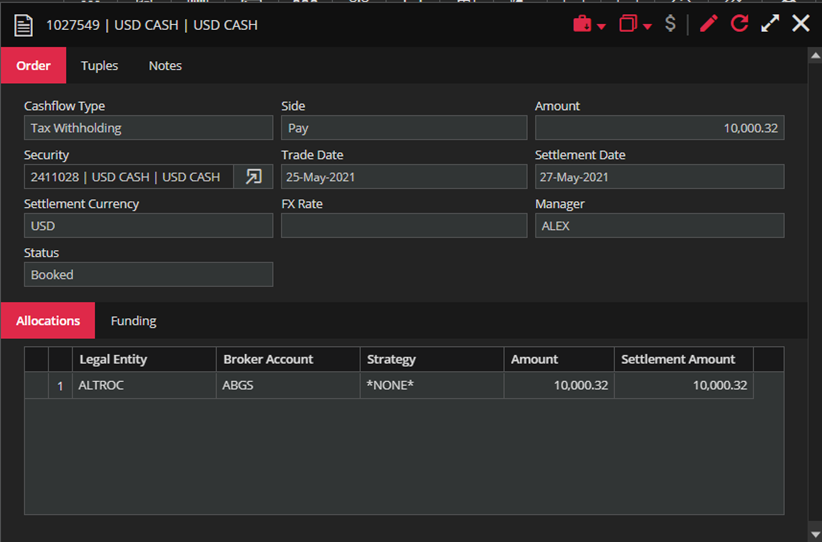
Cashflows and investments orders have only two tabs – Allocation and Funding (see screenshot below).
Again, the exception is an investment order with side Purchase Agreement booked against Environmental Credit Project that has only Allocations tab.
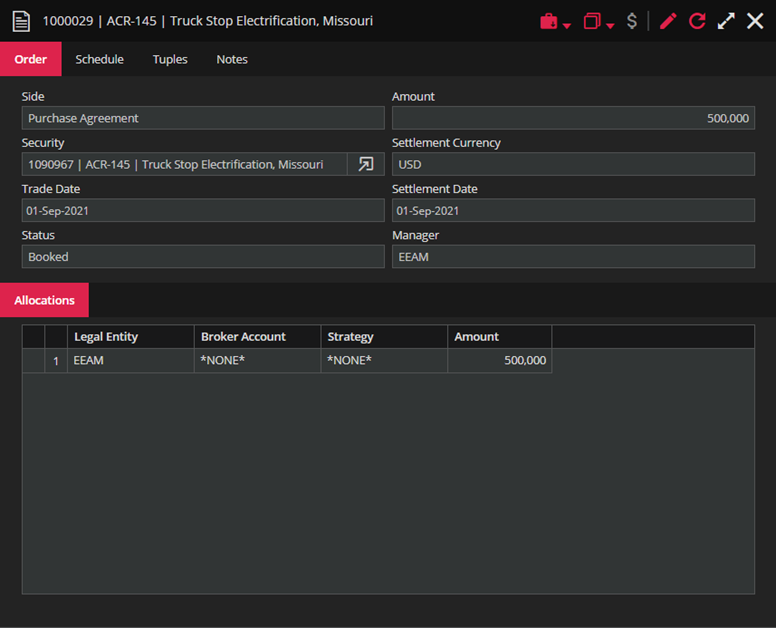
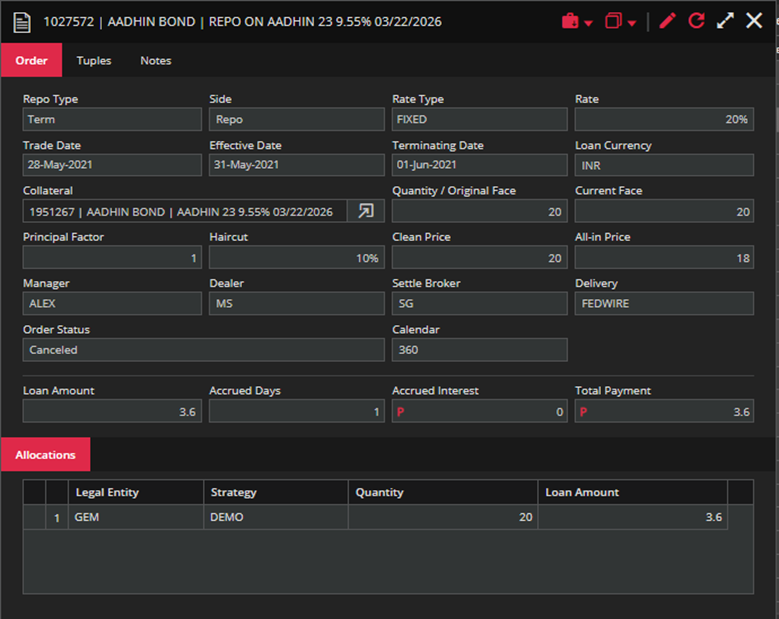
The repos also have only Allocations tab as you can see in the screenshot below.
Finally, let us consider trades.
All trades have Manual Matches tab and all trades with cost basis (Has Cost Basis value is ‘true’) have Cost Adjustments tab in the bottom section.
This is only relevant to Order Type = Trade. No Investment, no Cashflow, not Repo, not anything else.
In the screenshots below you can see trade with Manual Matches and Cost Adjustments tabs.
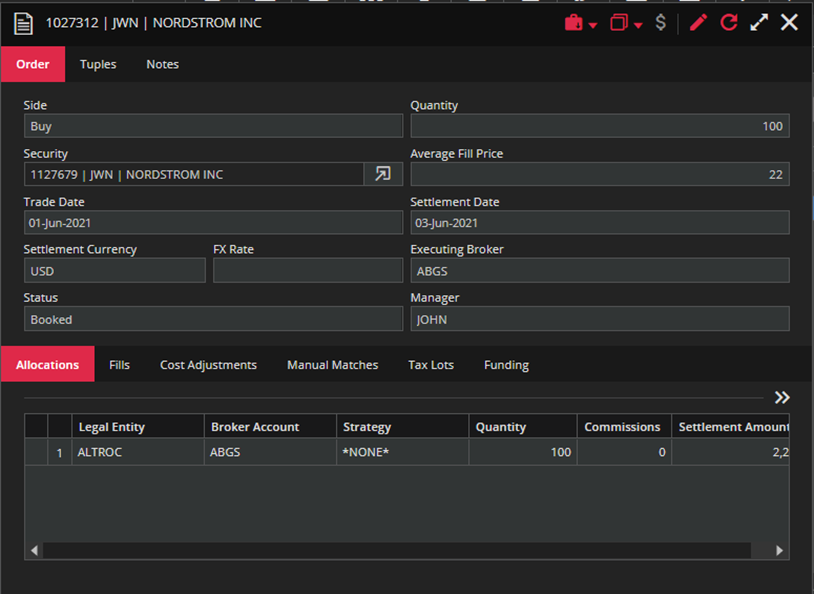
After you enter in edit mode we can add a new row in the Cost Adjustments by clicking on a blue “+” icon marked with green rectangle in the screenshot below.
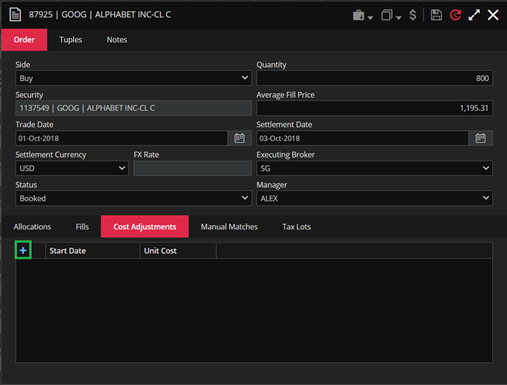
When user adds a new row to Cost Adjustments tab- the date will default to the last weekday of the last month.
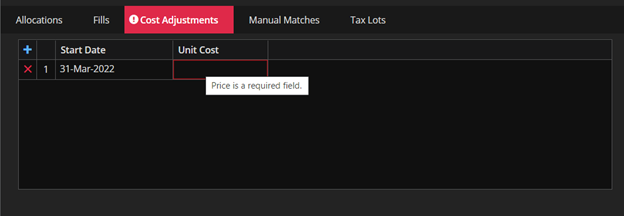
It should be mentioned that we can add cost adjustments to an order even when it is in a locked month.
